Konica Minolta HP PageWide XL 4000 MFP User Guide - Page 109
Print diagnostic plot, Check and recover print bar, Calibrate print bar, Enhanced printhead recovery
 |
View all Konica Minolta HP PageWide XL 4000 MFP manuals
Add to My Manuals
Save this manual to your list of manuals |
Page 109 highlights
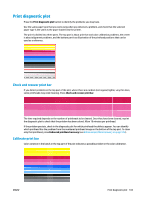
Print diagnostic plot Press the Print diagnostic plot button to identify the problems you may have. Use the same paper type that you were using when you detected a problem, and check that the selected paper type is the same as the paper loaded into the printer. The print is divided into three parts. The top part is about print-bar and color calibration problems, the center is about alignment problems, and the bottom part is an illustration of the printhead positions that can be used as a reference. Check and recover print bar If you detect problems in the top part of the plot, where there are random (not regular) lighter, very thin lines, some printheads may need cleaning. Press Check and recover print bar. The time required depends on the number of printheads to be cleaned. Once they have been cleaned, reprint the diagnostic plot to check that the problem has been solved. Allow 10 minutes per printhead. If the problem persists, check in the diagnostic plot for which printhead the defects appear. You can identify which printhead has the problem from the numbered printhead image on the bottom of the top part. To clean only that printhead, press Enhanced printhead recovery (see Enhanced printhead recovery on page 105). Calibrate print bar Color variation in the bands in the top part of the plot indicates a possible problem in the color calibration. ENWW Print diagnostic plot 103
-
 1
1 -
2
-
3
-
4
-
5
-
6
-
7
-
8
-
9
-
10
-
11
-
12
-
13
-
14
-
15
-
16
-
17
-
18
-
19
-
20
-
21
-
22
-
23
-
24
-
25
-
26
-
27
-
28
-
29
-
30
-
31
-
32
-
33
-
34
-
35
-
36
-
37
-
38
-
39
-
40
-
41
-
42
-
43
-
44
-
45
-
46
-
47
-
48
-
49
-
50
-
51
-
52
-
53
-
54
-
55
-
56
-
57
-
58
-
59
-
60
-
61
-
62
-
63
-
64
-
65
-
66
-
67
-
68
-
69
-
70
-
71
-
72
-
73
-
74
-
75
-
76
-
77
-
78
-
79
-
80
-
81
-
82
-
83
-
84
-
85
-
86
-
87
-
88
-
89
-
90
-
91
-
92
-
93
-
94
-
95
-
96
-
97
-
98
-
99
-
100
-
101
-
102
-
103
-
 104
104 -
 105
105 -
 106
106 -
 107
107 -
 108
108 -
 109
109 -
 110
110 -
 111
111 -
 112
112 -
 113
113 -
 114
114 -
115
-
116
-
117
-
118
-
119
-
120
-
121
-
122
-
123
-
124
-
125
-
126
-
127
-
128
-
129
-
130
-
131
-
132
-
133
-
134
-
135
-
136
-
137
-
138
 |
 |
