Konica Minolta Kodak Ngenuity 9090DB User Guide - Page 66
Installing the back imprinter and ink cartridge
 |
View all Konica Minolta Kodak Ngenuity 9090DB manuals
Add to My Manuals
Save this manual to your list of manuals |
Page 66 highlights
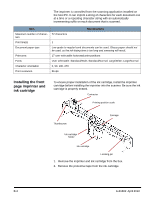
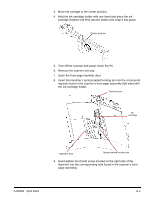
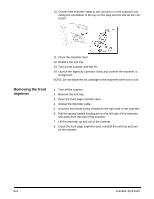
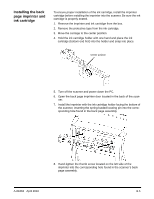
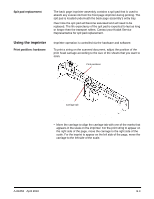
Installing the back page imprinter and ink cartridge To ensure proper installation of the ink cartridge, install the imprinter cartridge before installing the imprinter into the scanner. Be sure the ink cartridge is properly seated. 1. Remove the imprinter and ink cartridge from the box. 2. Remove the protective tape from the ink cartridge. 3. Move the carriage to the center position. 4. Hold the ink cartridge holder with one hand and place the ink cartridge (bottom end first) into the holder and snap into place. Center position 5. Turn off the scanner and power down the PC. 6. Open the back page imprinter door located in the back of the scanner. 7. Install the imprinter with the ink cartridge holder facing the bottom of the scanner, inserting the spring-loaded locating pin into the corresponding hole found in the back page assembly. 8. Hand-tighten the thumb screw located on the left side of the imprinter into the corresponding hole found in the scanner's back page assembly. A-61662 April 2010 B-5
-
 1
1 -
2
-
3
-
4
-
5
-
6
-
7
-
8
-
9
-
10
-
11
-
12
-
13
-
14
-
15
-
16
-
17
-
18
-
19
-
20
-
21
-
22
-
23
-
24
-
25
-
26
-
27
-
28
-
29
-
30
-
31
-
32
-
33
-
34
-
35
-
36
-
37
-
38
-
39
-
40
-
41
-
42
-
43
-
44
-
45
-
46
-
47
-
48
-
49
-
50
-
51
-
52
-
53
-
54
-
55
-
56
-
57
-
58
-
59
-
60
-
 61
61 -
 62
62 -
 63
63 -
 64
64 -
 65
65 -
 66
66 -
 67
67 -
 68
68 -
 69
69 -
 70
70 -
 71
71 -
72
-
73
-
74
-
75
-
76
-
77
-
78
 |
 |
