Konica Minolta MS6000 MK II Twain Driver and Overlay Manager Software Installa - Page 5
The TWAIN Driver User Interfaces, The MS 6000 Scanner Setup User Interface
 |
View all Konica Minolta MS6000 MK II manuals
Add to My Manuals
Save this manual to your list of manuals |
Page 5 highlights
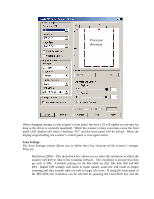
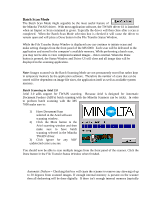
The TWAIN Driver User Interfaces When developing the TWAIN drivers for Minolta's scanners we tried to keep a consistent look and feel across all models. Since each scanner has unique functions and features the drivers do vary from model to model. In the following sections we walk through the MS 6000 and MS 7000 TWAIN drivers and explain what their various features and functions are as well as how to work with them. Remember that if, while working with a driver, you want a quick definition of a given feature you can always left-click the mouse while holding the pointer over the feature in question. This will launch a small window with information on that feature's functionality. Users of the MS 2000 and MS 3000 will find that nearly all the features of the scanner's TWAIN drivers are covered in the enclosed MS 6000 and MS 7000, PS 3000 and PS 7000 User's Guides as well. Nearly all selections in the TWAIN drivers are "sticky" and settings will remain unchanged if the driver is closed and reopened. Driver settings always take precedence over the scanner's front panel settings. Section 3 - The MS 6000 TWAIN Driver User's Guide The MS 6000 is KMBS' low-to-mid volume Microform scanner. It is very similar to its predecessor, the MS 2000, however it offers many new features. In order to scan-to-file with the MS 6000 the user must ensure that the optional PC interface kit is installed and the front panel of the MS 6000 is set to operate in PC mode. The scanner can be configured for PC mode by pressing the clear/Shift key and the multiple print/PC keys at the same time. These two keys are adjacent to each other and are located just above the Start button on the front panel. When in PC mode the scanner will display a capital "P" and a lower case "c". Once the TWAIN driver is launched the small "c" on the scanner's LED will change to a capital "C" to indicate that proper communication exists between the scanner and driver. The MS 6000 Scanner Setup User Interface When most off-the-shelf software applications (such as Adobe Acrobat®, Photoshop®, etc.) are instructed to acquire an image they will launch the MS 6000 Scanner Setup Window. This is your User Interface (UI) for communicating to the TWAIN driver. It allows you to configure the MS 6000 as necessary prior to scanning. Please keep in mind that many of the controls found in the driver's UI are also duplicated on the front panel of the scanner and can be controlled from the scanner itself. Since the front panel is also used for direct printing, some of the nomenclature used between the driver and front panel may differ. Please see the appropriate sections below to determine if UI settings are duplicated on the front panel and to determine which buttons duplicate those commands.
-
 1
1 -
 2
2 -
 3
3 -
 4
4 -
 5
5 -
 6
6 -
 7
7 -
 8
8 -
 9
9 -
 10
10 -
 11
11 -
12
-
13
-
14
-
15
-
16
-
17
-
18
-
19
-
20
-
21
-
22
-
23
-
24
-
25
-
26
-
27
-
28
-
29
-
30
-
31
-
32
-
33
-
34
-
35
-
36
-
37
-
38
-
39
-
40
-
41
-
42
-
43
-
44
-
45
-
46
-
47
-
48
-
49
-
50
-
51
-
52
-
53
-
54
-
55
-
56
-
57
-
58
-
59
 |
 |
