Konica Minolta MS6000 MK II Twain Driver and Overlay Manager Software Installa - Page 58
Brightness Controls, The Action Buttons
 |
View all Konica Minolta MS6000 MK II manuals
Add to My Manuals
Save this manual to your list of manuals |
Page 58 highlights
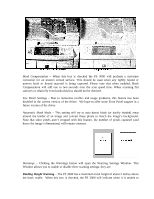
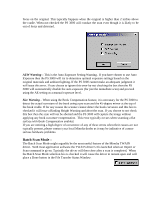
Brightness Controls This set of controls allows users to change the composition of the scanned image as detailed below. Please note that when using the slider bar you may notice some slight lag or resistance - this is normal and is due to the bi-directional communication between the driver and scanner. Automatic Brightness - Check this box if you wish to have the scanner perform a prescan and apply an appropriate brightness setting based on the detected original. Automatic brightness will assume an original of normal exposure. Brightness - Changing this value will cause the scanned image to appear lighter or darker. When automatic brightness (AB) is selected this value will work as a small adjustment to the brightness applied by the AB function. The slider can be set between 0 and 8. The Action Buttons The Action buttons allow you to interact with the driver User Interface to accomplish important tasks or launch support windows. Here is a detailed description of what these buttons do: Scan - Clicking the Scan button will cause the PS 3000 to initiate a scan using the currently selected configuration. Scans can also be initiated by pressing either Start button on the PS 3000's book cradle. When operating the PS 3000 in Batch Scan Mode (see above) this button will be disabled and all scans must be initialized via the book cradle's Start buttons. Scan All - When the PS 3000 is set for Dual Scan Mode the Scan button will change to a Scan All button. In addition to the Scan All button a Scan Left and a Scan Right button will activate under the Preview Window. The user now has a choice of three potential scan buttons. The Scan All button will cause the PS 3000 to scan both the left and right half of the total scan area and return two separate images to the application. Note: If the scanning software being used does not support the accepting of two or more image files from a single scan then most likely only the rightmost image will be accessible in the application software.
-
 1
1 -
2
-
3
-
4
-
5
-
6
-
7
-
8
-
9
-
10
-
11
-
12
-
13
-
14
-
15
-
16
-
17
-
18
-
19
-
20
-
21
-
22
-
23
-
24
-
25
-
26
-
27
-
28
-
29
-
30
-
31
-
32
-
33
-
34
-
35
-
36
-
37
-
38
-
39
-
40
-
41
-
42
-
43
-
44
-
45
-
46
-
47
-
48
-
49
-
50
-
51
-
52
-
 53
53 -
 54
54 -
 55
55 -
 56
56 -
 57
57 -
 58
58 -
 59
59
 |
 |
