Konica Minolta bizhub C759 bizhub C759/C659 Quick Start Guide - Page 229
Operation procedure: Recalling the custom size registered in memory
 |
View all Konica Minolta bizhub C759 manuals
Add to My Manuals
Save this manual to your list of manuals |
Page 229 highlights
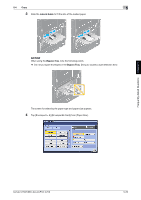
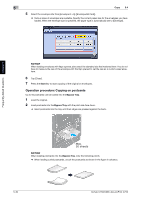
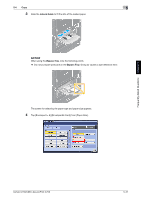
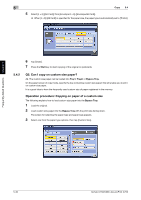
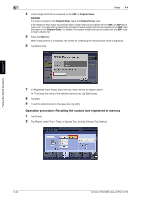
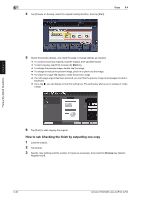
Frequently Asked Questions Chapter 5 5 Copy 5.4 4 Load a single sheet to be measured on the ADF or Original Glass. NOTICE If a sheet is loaded on the Original Glass, leave the Original Cover open. If the weight of thick paper exceeds the paper weight that can be loaded into the ADF, an ADF failure may occur. For paper with a weight that exceeds the paper weight that can be loaded into the ADF, load the paper on the Original Glass. For details on the paper weight that can be loaded into the ADF, refer to User's Guide CD. 5 Press the Start key. When measurement is completed, the screen for confirming the measurement result is displayed. 6 Tap [Store Size]. 7 In [Registered Paper Sizes], select the key of the memory to register data in. % To change the name of the selected memory key, tap [Edit Name]. 8 Tap [OK]. 9 To set the detected size to the paper size, tap [OK]. Operation procedure: Recalling the custom size registered in memory 1 Tap [Copy]. 2 Tap [Paper], select Tray1, Tray2, or Bypass Tray, and tap [Change Tray Setting]. 5-34 bizhub C759/C659, AccurioPrint C759
-
 1
1 -
2
-
3
-
4
-
5
-
6
-
7
-
8
-
9
-
10
-
11
-
12
-
13
-
14
-
15
-
16
-
17
-
18
-
19
-
20
-
21
-
22
-
23
-
24
-
25
-
26
-
27
-
28
-
29
-
30
-
31
-
32
-
33
-
34
-
35
-
36
-
37
-
38
-
39
-
40
-
41
-
42
-
43
-
44
-
45
-
46
-
47
-
48
-
49
-
50
-
51
-
52
-
53
-
54
-
55
-
56
-
57
-
58
-
59
-
60
-
61
-
62
-
63
-
64
-
65
-
66
-
67
-
68
-
69
-
70
-
71
-
72
-
73
-
74
-
75
-
76
-
77
-
78
-
79
-
80
-
81
-
82
-
83
-
84
-
85
-
86
-
87
-
88
-
89
-
90
-
91
-
92
-
93
-
94
-
95
-
96
-
97
-
98
-
99
-
100
-
101
-
102
-
103
-
104
-
105
-
106
-
107
-
108
-
109
-
110
-
111
-
112
-
113
-
114
-
115
-
116
-
117
-
118
-
119
-
120
-
121
-
122
-
123
-
124
-
125
-
126
-
127
-
128
-
129
-
130
-
131
-
132
-
133
-
134
-
135
-
136
-
137
-
138
-
139
-
140
-
141
-
142
-
143
-
144
-
145
-
146
-
147
-
148
-
149
-
150
-
151
-
152
-
153
-
154
-
155
-
156
-
157
-
158
-
159
-
160
-
161
-
162
-
163
-
164
-
165
-
166
-
167
-
168
-
169
-
170
-
171
-
172
-
173
-
174
-
175
-
176
-
177
-
178
-
179
-
180
-
181
-
182
-
183
-
184
-
185
-
186
-
187
-
188
-
189
-
190
-
191
-
192
-
193
-
194
-
195
-
196
-
197
-
198
-
199
-
200
-
201
-
202
-
203
-
204
-
205
-
206
-
207
-
208
-
209
-
210
-
211
-
212
-
213
-
214
-
215
-
216
-
217
-
218
-
219
-
220
-
221
-
222
-
223
-
 224
224 -
 225
225 -
 226
226 -
 227
227 -
 228
228 -
 229
229 -
 230
230 -
 231
231 -
 232
232 -
 233
233 -
 234
234 -
235
-
236
-
237
-
238
-
239
-
240
-
241
-
242
-
243
-
244
-
245
-
246
-
247
-
248
-
249
-
250
-
251
-
252
-
253
-
254
-
255
-
256
-
257
-
258
-
259
-
260
-
261
-
262
-
263
-
264
-
265
-
266
-
267
-
268
 |
 |
