Kyocera FS-C5100DN FS-C5100DN/C5200DN/C5300DN KX Driver User Guide Ver. 7.7 - Page 9
Windows XP - Network Connection, Custom Mode > Driver - driver windows 8
 |
UPC - 632983010280
View all Kyocera FS-C5100DN manuals
Add to My Manuals
Save this manual to your list of manuals |
Page 9 highlights
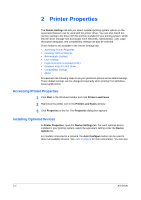
Windows XP - Network Connection Installation 4 On the Custom Installation page, ensure that the KX Driver is selected as the product and then click Next. 5 5 On the Confirm Settings page, click Install if the settings are correct. Click Back to correct the settings. 6 Note: If the Found New Hardware Wizard appears, click Cancel. If the Hardware Installation warning dialog box appears, click Continue Anyway. 6 The Installation Completed page appears showing the installation details. • Select Enable Status Monitor to display system status messages on your computer screen during printing tasks. For more information, see Status Monitor on page 2-13. • Select Print a test page to verify a connection with the printer and create a print out of the installed driver components. When the installation completes successfully, click Finish to exit the Printer Installation Wizard and return to the CD-ROM main menu. For software installation failures, a message box appears, One or more software installations have failed. See the details below. Click Finish and retry the installation. If the same message appears again, contact your system administrator. The installation of the printer is now complete. If prompted, restart your system. Windows XP - Network Connection 1 On the Installation Method page, select Custom Mode > Driver. If you also want to install fonts, select Utilities. 1 2 On the Connection Type page, select Network connection and then click Next. 2 3 On the Network Port Type page, select a port type. Select Standard TCP/IP Port. If you select Standard TCP/IP port, the installer automatically creates a new port if needed. 3 4 On the Printing System page, select the model and then click Next. 4 5 In Custom Installation, select the software packages you want to install, and clear those not intended for installation. Click Next. 5 6 In Printer Settings, you can assign a name for the printing system. This name appears in Windows Printers and Faxes and in the printer list in applications. You can also choose to share this printer with others or set this printer as the default printer. Make your selections and then click Next. 6 7 On the Standard TCP/IP Port dialog box, you can select Discover or Host name or IP address. 7 The Discover Printing System page opens to search the network for your printer. If Discovery does not find your printing system, a message appears. Ensure that your printer is properly connected. Contact your system administrator if the system cannot find your printer. If your printer is found, select it, and then click Next. To use Host name or IP address, type the IP address or host name and then click Next. User Guide 1-4
-
 1
1 -
2
-
3
-
 4
4 -
 5
5 -
 6
6 -
 7
7 -
 8
8 -
 9
9 -
 10
10 -
 11
11 -
 12
12 -
 13
13 -
 14
14 -
15
-
16
-
17
-
18
-
19
-
20
-
21
-
22
-
23
-
24
-
25
-
26
-
27
-
28
-
29
-
30
-
31
-
32
-
33
-
34
-
35
-
36
-
37
-
38
-
39
-
40
-
41
-
42
-
43
-
44
-
45
-
46
-
47
-
48
-
49
-
50
-
51
-
52
-
53
-
54
-
55
-
56
-
57
-
58
-
59
-
60
-
61
-
62
-
63
-
64
-
65
-
66
-
67
-
68
-
69
-
70
-
71
-
72
-
73
-
74
-
75
-
76
-
77
-
78
-
79
-
80
-
81
-
82
-
83
-
84
 |
 |
