Kyocera FS-C5200DN FS-C5100DN/C5200DN/C5300DN Operation Guide Rev-1.2 (Advance - Page 60
Cassette 1 to 4 Type Setting the cassette paper type
 |
View all Kyocera FS-C5200DN manuals
Add to My Manuals
Save this manual to your list of manuals |
Page 60 highlights
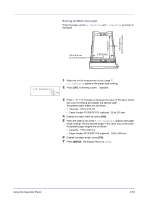
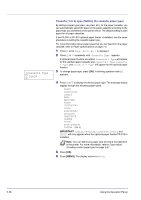
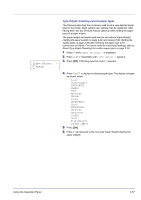
>Cassette Type ? PLAIN Cassette (1 to 4) Type (Setting the cassette paper type) By setting a paper type (plain, recycled, etc.) for the paper cassette, you can automatically select the paper in the paper cassette according to the paper type you command on the printer driver. The default setting is plain paper for all paper cassettes. If the PF-500 or PF-510 optional paper feeder is installed, use the same procedure to setting the cassette paper type. For more information about paper types that you can feed from the paper cassette, refer to Paper Specifications on page 1-2. 1 Press Z while Paper Settings > is displayed. 2 Press U or V repeatedly until >Cassette Type appears. If optional paper feeders are added, Cassette 1 Type will appear for the standard paper cassette and Cassette 2 Type, Cassette 3 Type, and Cassette 4 Type will appear for the optional paper feeders. 3 To change paper type, press [OK]. A blinking question mark (?) appears. 4 Press U or V to display the desired paper type. The message display toggles through the following paper types: PLAIN PREPRINTED LABELS BOND RECYCLED ROUGH LETTERHEAD COLOR PREPUNCHED ENVELOPE CARDSTOCK COATED THICK HIGH QUALITY CUSTOM 1 (to 8) IMPORTANT LABELS, ENVELOPE, CARDSTOCK, COATED and THICK will only appear when the optional paper feeder PF-510 is installed. Note You can define any paper type and store that definition in the printer. For more information, refer to Type Adjust (Creating custom paper type) on page 2-37. 5 Press [OK]. 6 Press [MENU]. The display returns to Ready. 2-36 Using the Operation Panel
-
 1
1 -
2
-
3
-
4
-
5
-
6
-
7
-
8
-
9
-
10
-
11
-
12
-
13
-
14
-
15
-
16
-
17
-
18
-
19
-
20
-
21
-
22
-
23
-
24
-
25
-
26
-
27
-
28
-
29
-
30
-
31
-
32
-
33
-
34
-
35
-
36
-
37
-
38
-
39
-
40
-
41
-
42
-
43
-
44
-
45
-
46
-
47
-
48
-
49
-
50
-
51
-
52
-
53
-
54
-
 55
55 -
 56
56 -
 57
57 -
 58
58 -
 59
59 -
 60
60 -
 61
61 -
 62
62 -
 63
63 -
 64
64 -
 65
65 -
66
-
67
-
68
-
69
-
70
-
71
-
72
-
73
-
74
-
75
-
76
-
77
-
78
-
79
-
80
-
81
-
82
-
83
-
84
-
85
-
86
-
87
-
88
-
89
-
90
-
91
-
92
-
93
-
94
-
95
-
96
-
97
-
98
-
99
-
100
-
101
-
102
-
103
-
104
-
105
-
106
-
107
-
108
-
109
-
110
-
111
-
112
-
113
-
114
-
115
-
116
-
117
-
118
-
119
-
120
-
121
-
122
-
123
-
124
-
125
-
126
-
127
-
128
-
129
-
130
-
131
-
132
-
133
-
134
-
135
-
136
-
137
-
138
-
139
-
140
 |
 |
