LG 32LC2DA Operation Guide - Page 7
Introduction
 |
View all LG 32LC2DA manuals
Add to My Manuals
Save this manual to your list of manuals |
Page 7 highlights
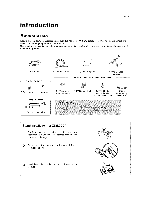
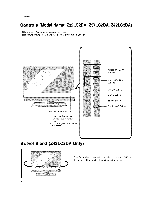
int n Introduction Ensure that the following accessories are included with your TV. If any accessory is missing, please contact the dealer from where you purchased the producL User must use shielded signal interface cables (D-sub 15 pin cable) with ferfite cores to maintain standard compliance for the product. Power Cord 75_ Round Cable For Z42i50PX3D _ Owner's Manual For Z32LC2DA, _7LC2DA, Remote Control / Batteries Z42LC2DA 2=TV brackets 2-Wall brackets 2-TV Bracket Bolts Twister Holder Arrange the wires with the twister holder. Cable Management (Refer p,t8) Stand Installation for Z32LC2DA 1 Carefully place the product screen side down on a cushioned surface that will protect product and screen from damage. 2 Place the hook of the stand in the back of the product as shown. 3 Instalt the 4 bolts provided securely, in the back of the product. 7
-
 1
1 -
 2
2 -
 3
3 -
 4
4 -
 5
5 -
 6
6 -
 7
7 -
 8
8 -
 9
9 -
 10
10 -
 11
11 -
 12
12 -
13
-
14
-
15
-
16
-
17
-
18
-
19
-
20
-
21
-
22
-
23
-
24
-
25
-
26
-
27
-
28
-
29
-
30
-
31
-
32
-
33
-
34
-
35
-
36
-
37
-
38
-
39
-
40
-
41
-
42
-
43
-
44
-
45
-
46
-
47
-
48
-
49
-
50
-
51
-
52
-
53
-
54
-
55
-
56
-
57
-
58
-
59
-
60
-
61
-
62
-
63
-
64
-
65
-
66
 |
 |
