LG 32LC2R Owners Manual - Page 28
When connecting with a D-sub 15 pin cable - service menu
 |
View all LG 32LC2R manuals
Add to My Manuals
Save this manual to your list of manuals |
Page 28 highlights
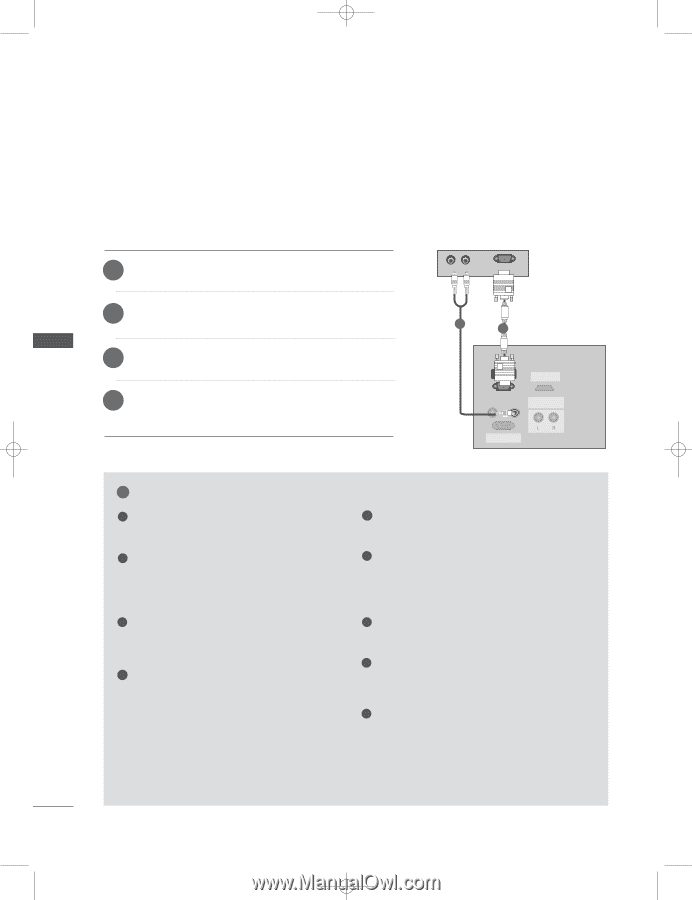
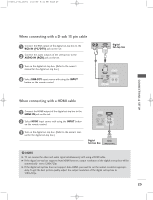
0323G_1-en_rev01 2/28/06 4:13 PM Page 26 CONNECTIONS & SETUP PC SETUP I This TV provides Plug and Play capability, meaning that the PC adjusts automatically to the TV's settings. When connecting with a D-sub 15 pin cable 1 Connect the TV to the PC with the PC cable. 2 Connect the PC audio putput to the TV's AUDIO IN (RGB) input. 3 Turn on the PC. 4 Select RGB input source with using the INPUT button on the remote control. (R) AUDIO (L) RGB-DTV OUTPUT PC 2 1 RGB IN (PC/DTV) HDMI IN REMOTE AUDIO IN CONTROL IN (RGB) VARIABLE AUDIO OUT RS-232C IN (CONTROL&SERVICE) CONNECTIONS & SETUP ! NOTE 1 To enjoy vivid picture and sound, connect a PC to 5 The synchronization input form for Horizontal the set. and Vertical frequencies is separate. 2 Avoid keeping a fixed image on the set's screen for a long period of time. The fixed image may become permanently imprinted on the screen; use a screen saver when possible. 6 We recommend using 640x480, 60Hz (42PC1RV*, 42PC3RV*) /1024x768, 60Hz (26LC2R*, 32LC2R*) for the PC mode, they provide the best picture quality. 3 Connect PC to the RGB INPUT(PC INPUT) port of the set; change the resolution output of PC accordingly. 4 There might be a noise according to some resolution, vertical pattern, contrast or brightness in PC mode. Then change the PC mode into other resolution or change the refresh rate into other rate or adjust the brightness and contrast on the menu until the picture is clean. If the refresh rate of the PC graphic card can not be changed, change the PC graphic card or consult it to the manufacturer of the PC graphic card. 7 If the resolution of PC is over UXGA, there will be no picture on the set. 8 Connect the audio cable from the PC to the Audio input on the set. (Audio cables are not included with the set). 9 When you use too long RGB-PC cable, there might be a noise on the screen. We recommend using under 5m of the cable. It provides the best picture quality. 26
-
 1
1 -
2
-
3
-
4
-
5
-
6
-
7
-
8
-
9
-
10
-
11
-
12
-
13
-
14
-
15
-
16
-
17
-
18
-
19
-
20
-
21
-
22
-
 23
23 -
 24
24 -
 25
25 -
 26
26 -
 27
27 -
 28
28 -
 29
29 -
 30
30 -
 31
31 -
 32
32 -
 33
33 -
34
-
35
-
36
-
37
-
38
-
39
-
40
-
41
-
42
-
43
-
44
-
45
-
46
-
47
-
48
-
49
-
50
-
51
-
52
-
53
-
54
-
55
-
56
-
57
-
58
-
59
-
60
-
61
-
62
-
63
-
64
-
65
-
66
-
67
-
68
-
69
-
70
-
71
-
72
-
73
-
74
-
75
-
76
-
77
-
78
-
79
-
80
-
81
-
82
-
83
-
84
-
85
-
86
-
87
 |
 |