LG 32LC2R Owners Manual - Page 81
Aspect Ratio Command2:c Main picture size
 |
View all LG 32LC2R manuals
Add to My Manuals
Save this manual to your list of manuals |
Page 81 highlights
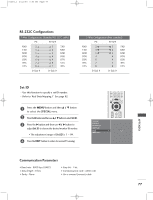
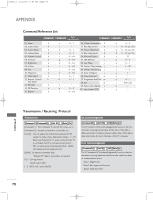
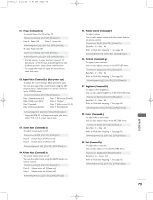
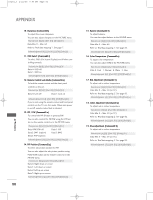
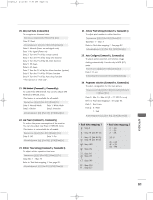
0323G_3 2/22/06 8:58 PM Page 79 01. Power (Command2:a) To control Power On/Off of the TV. Transmission [k][a][ ][Set ID][ ][Data][Cr] Data 0 : Power Off Data 1 : Power On Acknowledgement [a][ ][Set ID][ ][OK][Data][x] To show Power On/Off. Transmission [k][a][ ][Set ID][ ][FF][Cr] Acknowledgement [a][ ][Set ID][ ][OK][Data][x] * In a like manner, if other functions transmit 'FF' data based on this format, Acknowledgement data feedback presents status about each function. * To change the Power on input the transmission more than twice. 02. Aspect Ratio (Command2:c) (Main picture size) To adjust the screen format. (Main picture format) You can also adjust the screen format using the ARC (Aspect Ratio Control) button on remote control or in the SCREEN menu. Transmission [k][c][ ][Set ID][ ][Data][Cr] Date 1: Normal screen (4:3) Date 2: Wide screen (16:9) Date 3: Spectacle Date 4: Full screen (Zoom1) Date 5: Full screen (Zoom2) Date 6: Original Date 7: Wide screen (14:9) Date 8: Full (Option) Acknowledgement [c][ ][Set ID][ ][OK][Data][x] * Using the RGB-PC or Component input, you select either 16:9 or 4:3 screen aspect ratio. 03. Screen Mute (Command2:d) To select screen mute on/off. Transmission [k][d][ ][Set ID][ ][Data][Cr] Data 0 : Screen mute off (Picture on) Data 1 : Screen mute on (Picture off) Acknowledgement [d][ ][Set ID][ ][OK][Data][x] 04. Volume Mute (Command2:e) To control volume mute on/off. You can also adjust mute using the MUTE button on remote control. Transmission [k][e][ ][Set ID][ ][Data][Cr] Data 0 : Volume mute off (Volume on) Data 1 : Volume mute on (Volume off) Acknowledgement [e][ ][Set ID][ ][OK][Data][x] 05. Volume Control (Command2:f) To adjust volume. You can also adjust volume with the volume buttons on remote control. Transmission [k][f][ ][Set ID][ ][Data][Cr] Data Min : 0 ~ Max : 64 Refer to 'Real data mapping 1 '. See page 82. Acknowledgement [f][ ][Set ID][ ][OK][Data][x] 06. Contrast (Command2:g) To adjust screen contrast. You can also adjust contrast in the PICTURE menu. Transmission [k][g][ ][Set ID][ ][Data][Cr] Data Min : 0 ~ Max : 64 Refer to 'Real data mapping 1'. See page 82. Acknowledgement [g][ ][Set ID][ ][OK][Data][x] 07. Brightness (Command2:h) To adjust screen brightness. You can also adjust brightness in the PICTURE menu. Transmission [k][h][ ][Set ID][ ][Data][Cr] Data Min : 0 ~ Max : 64 Refer to 'Real data mapping 1'. See page 82. Acknowledgement [h][ ][Set ID][ ][OK][Data][x] 08. Colour (Command2:i) To adjust the screen colour. You can also adjust colour in the PICTURE menu. Transmission [k][i][ ][Set ID][ ][Data][Cr] Data Min : 0 ~ Max : 64 Refer to 'Real data mapping 1'. See page 82. Acknowledgement [i][ ][Set ID][ ][OK][Data][x] 09. Tint (Command2:j) To adjust the screen tint. You can also adjust tint in the PICTURE menu. Transmission [k][j][ ][Set ID][ ][Data][Cr] Data Red : 0 ~ Green : 64 Refer to 'Real data mapping 1'. See page 82. Acknowledgement [j][ ][Set ID][ ][OK][Data][x] 79 APPENDIX
-
 1
1 -
2
-
3
-
4
-
5
-
6
-
7
-
8
-
9
-
10
-
11
-
12
-
13
-
14
-
15
-
16
-
17
-
18
-
19
-
20
-
21
-
22
-
23
-
24
-
25
-
26
-
27
-
28
-
29
-
30
-
31
-
32
-
33
-
34
-
35
-
36
-
37
-
38
-
39
-
40
-
41
-
42
-
43
-
44
-
45
-
46
-
47
-
48
-
49
-
50
-
51
-
52
-
53
-
54
-
55
-
56
-
57
-
58
-
59
-
60
-
61
-
62
-
63
-
64
-
65
-
66
-
67
-
68
-
69
-
70
-
71
-
72
-
73
-
74
-
75
-
 76
76 -
 77
77 -
 78
78 -
 79
79 -
 80
80 -
 81
81 -
 82
82 -
 83
83 -
 84
84 -
 85
85 -
 86
86 -
87
 |
 |