LG 32LD340H Owners Manual - Page 58
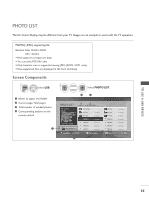
Photo Selection and PopUp Menu, PHOTO LIST
 |
View all LG 32LD340H manuals
Add to My Manuals
Save this manual to your list of manuals |
Page 58 highlights
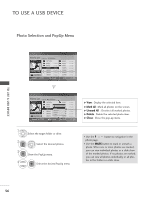
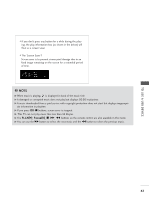
TO USE A USB DEVICE TO USE A USB DEVICE Photo Selection and PopUp Menu PHOTO LIST Drive1 JMJ001 1366x768, 125KB Up Folder Page 2/3 No Marked Up Folder KR101 KR102 JMJ001 JMJ002 JMJ003 JMJ004 12/10/2009 12/10/2009 12/10/2009 12/10/2009 12/10/2009 12/10/2009 Navigation OPTION Page Change KR103 KR104 KR105 JMJ005 JMJ006 JMJ007 JMJ008 MARK Mark 12/10/2009 12/10/2009 12/10/2009 12/10/2009 12/10/2009 12/10/2009 12/10/2009 Exit PHOTO LIST Drive1 JMJ001 1366x768, 125KB Up Folder Page 2/3 No Marked Up Folder KR103 KR101 KR102 JMJ001 JMJ002 JMJ003 JMJ004 12/10/2009 KR104 1366x768, 125KB 12/10/2009 KR105 View 12/10/2009 Mark All 12/10/2009 Delete 1C2/l1o0/s20e09 JMJ005 JMJ006 JMJ007 12/10/2009 JMJ008 Navigation OPTION Page Change MARK Mark 12/10/2009 12/10/2009 12/10/2009 12/10/2009 12/10/2009 12/10/2009 12/10/2009 Exit G View : Display the selected item. G Mark All : Mark all photos on the screen. G Unmark All : Deselect all marked photos. G Delete : Delete the selected photo item. G Close : Close the pop-up menu. 1 Select the target folder or drive. 2 OK Select the desired photos. 3 OK Show the PopUp menu. 4 OK Select the desired PopUp menu. • Use the P button to navigation in the photo page. • Use the MARK button to mark or unmark a photo. When one or more photos are marked, you can view individual photos or a slide show of the marked photos. If no photos are marked, you can view all photos individually or all pho- tos in the folder in a slide show. 56
-
 1
1 -
2
-
3
-
4
-
5
-
6
-
7
-
8
-
9
-
10
-
11
-
12
-
13
-
14
-
15
-
16
-
17
-
18
-
19
-
20
-
21
-
22
-
23
-
24
-
25
-
26
-
27
-
28
-
29
-
30
-
31
-
32
-
33
-
34
-
35
-
36
-
37
-
38
-
39
-
40
-
41
-
42
-
43
-
44
-
45
-
46
-
47
-
48
-
49
-
50
-
51
-
52
-
 53
53 -
 54
54 -
 55
55 -
 56
56 -
 57
57 -
 58
58 -
 59
59 -
 60
60 -
 61
61 -
 62
62 -
 63
63 -
64
-
65
-
66
-
67
-
68
-
69
-
70
-
71
-
72
-
73
-
74
-
75
-
76
-
77
-
78
-
79
-
80
-
81
-
82
-
83
-
84
-
85
-
86
-
87
-
88
-
89
-
90
-
91
-
92
-
93
-
94
-
95
-
96
-
97
-
98
-
99
-
100
-
101
-
102
-
103
-
104
-
105
-
106
-
107
-
108
-
109
-
110
 |
 |
