LG 40LV570H INSTALLATION - Page 13
EZ-Manager Wizard Cont.
 |
View all LG 40LV570H manuals
Add to My Manuals
Save this manual to your list of manuals |
Page 13 highlights
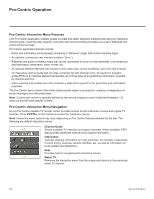
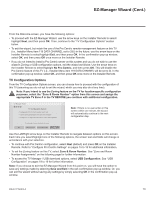
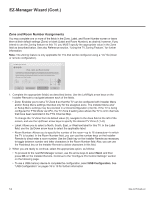
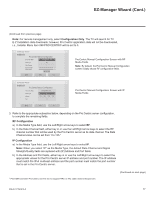
EZ-Manager Wizard (Cont.) From the Welcome screen, you have the following options: • To proceed with the EZ-Manager Wizard, use the arrow keys on the Installer Remote to select/ highlight Next, and then press OK. Then, continue to the "TV Configuration Options" section below. • To exit the wizard, but retain the use of the Pro:Centric remote management feature on this TV (i.e., Installer Menu item 119 DATA CHANNEL set to 255) in the future, use the arrow keys on the Installer Remote to select/highlight Exit, and then press OK. In the confirmation pop-up window, select OK, and then press OK once more on the Installer Remote. • If you do not intend to install a Pro:Centric server on this system and you do not wish to use the wizard's Zoning or USB configuration options, exit the wizard as follows: Use the arrow keys on the Installer Remote to select/highlight No Pro:Centric, and then press OK. This will disable the Pro:Centric feature of this TV (i.e., Installer Menu item 119 DATA CHANNEL will be set to 0). In the confirmation pop-up window, select OK, and then press OK once more on the Installer Remote. TV Configuration Options From the TV Configuration Options screen, you can choose how to proceed with the configuration of this TV (assuming you do not opt to exit the wizard, which you may also do at any time). Note: If you intend to use the Zoning feature on the TV for location-specific configuration purposes, select the "Zone & Room Number" option from this screen and assign the appropriate TV Zone # in the TV BEFORE you continue with additional configuration. Z EZ-Manager Wizard 1 234 TV Configuration Options • To configure the TV for Pro:Centric operation, select 'Next'. • To set the optional Zoning feature, select 'Zone & Room Number'. • To configure the TV using a USB memory device, select 'USB Configuration'. Note: If there is no user action in this screen within one minute, the wizard will automatically continue to the next configuration step. This setup wizard will continue automatically in 60 seconds. Exit USB Configuration Zone & Room Number Next Use the Left/Right arrow keys on the Installer Remote to navigate between options on this screen. Each time you select/highlight one of the following options, the screen text and fields will change in accordance with your selection. • To continue with Pro:Centric configuration, select Next (default) and press OK on the Installer Remote. Refer to "Configure Pro:Centric Settings" on pages 15 to 18 for additional information. • To set the Zoning feature on this TV, select Zone & Room Number. See "Zone and Room Number Assignments" on the following page for further information. • To access the TV Manager / USB download options, select USB Configuration. See "USB Configuration" on pages 18 to 19 for further information. Note: If you choose to exit the EZ-Manager Wizard from this point on, you will have the option to save any settings made by selecting Save and Exit in the exit confirmation pop-up window. Or, you can exit the wizard without saving any settings by simply selecting OK in the confirmation pop-up window. 206-4317 Draft A.2 13
-
 1
1 -
2
-
3
-
4
-
5
-
6
-
7
-
 8
8 -
 9
9 -
 10
10 -
 11
11 -
 12
12 -
 13
13 -
 14
14 -
 15
15 -
 16
16 -
 17
17 -
 18
18 -
19
-
20
-
21
-
22
-
23
-
24
-
25
-
26
-
27
-
28
-
29
-
30
-
31
-
32
-
33
-
34
-
35
-
36
-
37
-
38
-
39
-
40
-
41
-
42
-
43
-
44
-
45
-
46
-
47
-
48
-
49
-
50
-
51
-
52
-
53
-
54
-
55
-
56
-
57
-
58
-
59
-
60
-
61
-
62
-
63
-
64
-
65
-
66
-
67
-
68
-
69
-
70
-
71
-
72
-
73
 |
 |