LG 40LV570H INSTALLATION - Page 47
IP Environment Setup
 |
View all LG 40LV570H manuals
Add to My Manuals
Save this manual to your list of manuals |
Page 47 highlights
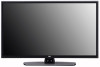
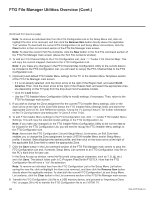
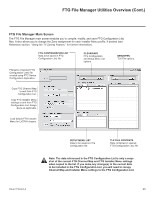
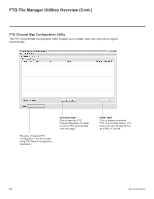
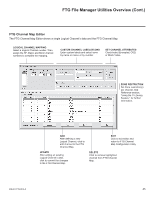
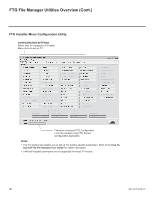
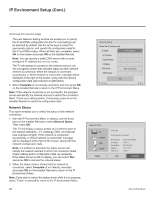
IP Environment Setup The IP Environment Menu enables you to set up the network features of the TV. With the exception of Network Connection settings, the IP Environment settings are editable (with the Installer Remote) only if the TV is in Pass-through Mode and read-only when the TV is not in Pass-through Mode. Also, if you intend to create a Master TV Setup for cloning purposes (see Master TV Setup procedure on pages 34 to 36), all IP Environment settings, with the exception of the Network Connection settings, may be cloned. Accessing the IP Environment Menu 1. Use the Installer Remote to access the Installer Menu (see "Accessing the Installer Menu" on page 23 for further information). 2. Navigate to Installer Menu item 119 DATA CHANNEL, and press 2-5-3 + MENU SETTINGS to launch the IP Environment Menu (see example at right). Use the Up/Down arrow keys on the Installer Remote to select the desired menu option and then press OK. Refer to the following sections for information on each of the IP Environment setup options. When you have completed your IP Environment configuration as required, press EXIT or on the Installer Remote to exit the IP Environment Menu. Configuring the Network Connection This option enables you to set up the TV's wired network connection. 1. With the IP Environment Menu on display, use the arrow keys on the Installer Remote to select Network Connection. Then, press OK. The first of a series of Network Setting windows will be displayed on the screen. 2. If not already done, connect the appropriate cable between the TV and the network. Then, use the arrow keys on the Installer Remote to select Start Connection and press OK. 3. By default, the TV is configured for DHCP. If configured, the DHCP server will assign an IP address to the TV once the TV successfully connects to the network, and a "Wired network is connected" message will be displayed at the top of the next Network Setting screen (see example at right). • If no further network configuration is required, use the arrow keys on the Installer Remote to select Complete and press OK to return to the IP Environment Menu. • If a DHCP server is not configured and/or if you wish to set static IP configuration data for the TV, continue with step 4. 4. Use the arrow keys on the Installer Remote to select Set Expert from the Network Setting screen, and then press OK. 206-4317 Draft A.2 IP Environment Move OK • Network Connection • Network Status • Pro:Centric • MAC Address: 3C:CD:93:E5:78:8F Note: When you enter the IP Environment Menu, the Installer Menu is exited (all current settings are saved automatically upon exit). If you are also in the process of updating Installer Menu items, you may wish to set all items as needed before you access the IP Environment Menu. Otherwise, after exiting the IP Environment Menu, you will need to reaccess the Installer Menu to set additional items. Network Setting Connect a LAN cable to the back of TV. Setting your network will enable network-related features on the TV. Start Connection Previous Next Network Setting i Wired network is connected. For detailed settings, select [Set Expert]. Set Expert Complete Previous (Continued on next page) 47
-
 1
1 -
2
-
3
-
4
-
5
-
6
-
7
-
8
-
9
-
10
-
11
-
12
-
13
-
14
-
15
-
16
-
17
-
18
-
19
-
20
-
21
-
22
-
23
-
24
-
25
-
26
-
27
-
28
-
29
-
30
-
31
-
32
-
33
-
34
-
35
-
36
-
37
-
38
-
39
-
40
-
41
-
 42
42 -
 43
43 -
 44
44 -
 45
45 -
 46
46 -
 47
47 -
 48
48 -
 49
49 -
 50
50 -
 51
51 -
 52
52 -
53
-
54
-
55
-
56
-
57
-
58
-
59
-
60
-
61
-
62
-
63
-
64
-
65
-
66
-
67
-
68
-
69
-
70
-
71
-
72
-
73
 |
 |