LG KF900 User Guide - Page 47
Using the advanced settings
 |
View all LG KF900 manuals
Add to My Manuals
Save this manual to your list of manuals |
Page 47 highlights
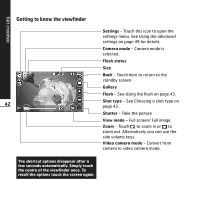
Using the advanced settings From the viewfinder touch to open all the advanced settings options. Preview settings ° Exposure: Exposure value refers to the amount of light for a given exposure. When the main subject is darker than the background, increase exposure value. If the subject is much lighter than the background, decrease exposure value. ° Size: Change the size of the photo to save on memory space or take a picture preset to the correct size for contact. See Changing the image size on page 46. ° Colour Effect: Choose a colour tone to apply to the photo you're taking. See Choosing a colour effect on page 46. ° White balance: Choose from Auto, Incandescent, Sunny, Flourescent or Cloudy. ° Macro: Switch on to take close up shots. ° Self-timer: The self-timer allows you to set a delay after the capture button is pressed. Choose from 3 seconds, 5 seconds or 10 seconds. Great for that group photo you want to be part of. ° ISO: ISO determines the sensitivity of the camera's light sensor. The higher the ISO, the more sensitive the camera will be. This is useful in darker conditions when the flash can't be used. Choose an ISO value from Auto, ISO 100, ISO 200, ISO 400 or ISO 800. ° Quality: Choose between Super fine, Fine and Normal. The finer the quality the sharper a photo will be, but the file size will increase as a result, which means you'll be able to store fewer photos in your memory. ° Inner/Outer Camera: For self portraits, switch to the LG KF900's inner camera. Other settings ° Memory: Choose whether to save your photos to the Handset memory or to the External memory. ° Image stabilization: Enables you to take a photo without camera instability or shake. 45 ° Focus: Choose from On or Off. ° Shutter sound: Select one of the three shutter sounds. ° Grid screen: Choose from Off, Simple cross or Trisection ° Reset settings: Reset all the camera settings. When you exit the camera all your settings will return to default, except image size and image quality. Any nondefault settings you require will need to be reset, for example colour tone and ISO. Check them before you shoot your next photo. Get creative
-
 1
1 -
2
-
3
-
4
-
5
-
6
-
7
-
8
-
9
-
10
-
11
-
12
-
13
-
14
-
15
-
16
-
17
-
18
-
19
-
20
-
21
-
22
-
23
-
24
-
25
-
26
-
27
-
28
-
29
-
30
-
31
-
32
-
33
-
34
-
35
-
36
-
37
-
38
-
39
-
40
-
41
-
 42
42 -
 43
43 -
 44
44 -
 45
45 -
 46
46 -
 47
47 -
 48
48 -
 49
49 -
 50
50 -
 51
51 -
 52
52 -
53
-
54
-
55
-
56
-
57
-
58
-
59
-
60
-
61
-
62
-
63
-
64
-
65
-
66
-
67
-
68
-
69
-
70
-
71
-
72
-
73
-
74
-
75
-
76
-
77
-
78
-
79
-
80
-
81
-
82
-
83
-
84
-
85
-
86
-
87
-
88
-
89
-
90
-
91
-
92
-
93
-
94
-
95
-
96
-
97
-
98
 |
 |