LG KG6000R Owners Manual - Page 11
C. How To Secure The Drain Pipe, Removal, Window, N Cords
 |
View all LG KG6000R manuals
Add to My Manuals
Save this manual to your list of manuals |
Page 11 highlights
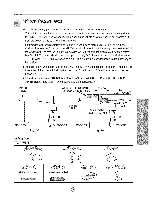
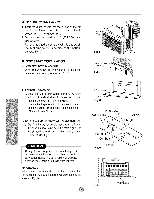
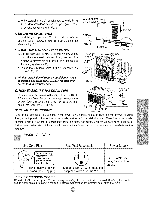
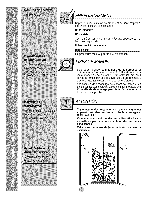
b. While steadying the air conditioner, carefully bring the window sash down behind the upper guide of the air conditioner, as shown in Fig, 11. 4. SECURE THE GUIDE PANELS Extend the guide panels (TYPE F) to fill the window opening using 4 screws (TYPE B) to secure them, as shown in Fig. 12. 5. INSTALL THE SASH SEAL AND SASH LOCK a. Cut the sash seal (TYPE E) to the window width Stuff the sash seal between the glass and the window to prevent air and insects from getting into the room, as shown in Fig. 12. b. Fasten the L bracket using a (TYPE A) screw, as shown in Fig. 12. Wl NDOW FRAME_-_ _-SEAL ABOUT I/4 ] L BRACKET I L BRACKET .... EAL (TYPE E} TYPE B & Window installation of room air conditioner is now completed. See ELECTRICAL DATA for attaching _wer cord to electrical outlet. C. HOW TO SECURE THE DRAIN PIPE Hang l ® In humid weather, excess water may cause the BASE PAN to overflow. To drain the water, remove the DRAIN CAP and secure the DRAIN PIPE to the rear hole of the BASE PAN. (Fig. 13) REMOVAL FROM WINDOW Fig. 13 DRAINCAP DRAINPIPE Turn the air conditioner off, disconnect the power cord, remove the L bracket and the screws installed through the top and bottom of the guide panels, and save for reinstallation later. Close the guide panels. Keeping a firm grip on the air conditioner, raise the sash, and carefully tilt the air conditioner backward, draining any condensate. Lift the air conditioner from the window and remove the sash seal from be_een the wi ndows. Line Cord Plug Use Wall Receptacle Power Supply (-Do not under any" clrcumstance,_ cut or remove the I grounding prong u 3P-opwroenrg sugprpoluyndcinogrd pwluithg Standard 125V, 3-wire grounding receptacle rated 15A, 125V AC Use 15 AMP time delay fuse or circuit breaker. USE OF EX N CORDS Because of potential safety hazards, we strongly discourage the use of an extension cord. However, if you wish to use an extension cord, use a CSA certified/UL-listed 3-wire (grounding) extension cord, rated 15A, 125V.
-
 1
1 -
2
-
3
-
4
-
5
-
 6
6 -
 7
7 -
 8
8 -
 9
9 -
 10
10 -
 11
11 -
 12
12 -
 13
13 -
 14
14 -
 15
15 -
 16
16 -
17
-
18
-
19
-
20
-
21
-
22
-
23
-
24
-
25
-
26
-
27
-
28
-
29
-
30
-
31
-
32
-
33
-
34
-
35
-
36
-
37
-
38
-
39
 |
 |
