LG LAN121CNM Service Manual - Page 17
How to Mount Installation Plate, Drill a Hole In The Wall
 |
View all LG LAN121CNM manuals
Add to My Manuals
Save this manual to your list of manuals |
Page 17 highlights
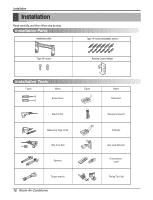
How to Mount Installation Plate The wall you select should be strong and solid enough to prevent vibration 1. Mount the installation plate on the wall with type "A" screws. If mounting the unit on a concrete wall, use anchor bolts. • Mount the installation plate horizontally by aligning the centerline using a level. Chassis Hook Installation Plate Type "A" 2. Measure the wall and mark the centerline. It is also important to use caution concerning the location of the installation plate-routing of the wiring to power outlets is through the walls typically. Drilling the hole through the wall for piping connections must be done safely. CHASSIS Distance (mm) (Grade) A B C D S4 50 105 59 105 SE 65 110 85 110 S5 95 122 235 122 D Installation plate B C Ø70mm Left rear piping A Ø70mm Right rear piping Drill a Hole In The Wall • Drill the piping hole with a ø70mm(2.76in) hole core drill. Drill the piping hole at either the right or the left with the hole slightly slanted to the outdoor side. Indoor WALL Outdoor 5-7mm (0.2~0.3") Service Manual 17
-
 1
1 -
2
-
3
-
4
-
5
-
6
-
7
-
8
-
9
-
10
-
11
-
 12
12 -
 13
13 -
 14
14 -
 15
15 -
 16
16 -
 17
17 -
 18
18 -
 19
19 -
 20
20 -
 21
21 -
 22
22 -
23
-
24
-
25
-
26
-
27
-
28
-
29
-
30
-
31
-
32
-
33
-
34
-
35
-
36
-
37
-
38
-
39
-
40
-
41
-
42
-
43
-
44
-
45
-
46
-
47
-
48
-
49
-
50
-
51
-
52
-
53
-
54
-
55
-
56
-
57
-
58
-
59
-
60
-
61
-
62
-
63
-
64
-
65
-
66
-
67
-
68
-
69
-
70
-
71
 |
 |
