LG LRG30355SB Owner's Manual (English) - Page 12
Control Panel-non-convection Models
 |
UPC - 048231315876
View all LG LRG30355SB manuals
Add to My Manuals
Save this manual to your list of manuals |
Page 12 highlights
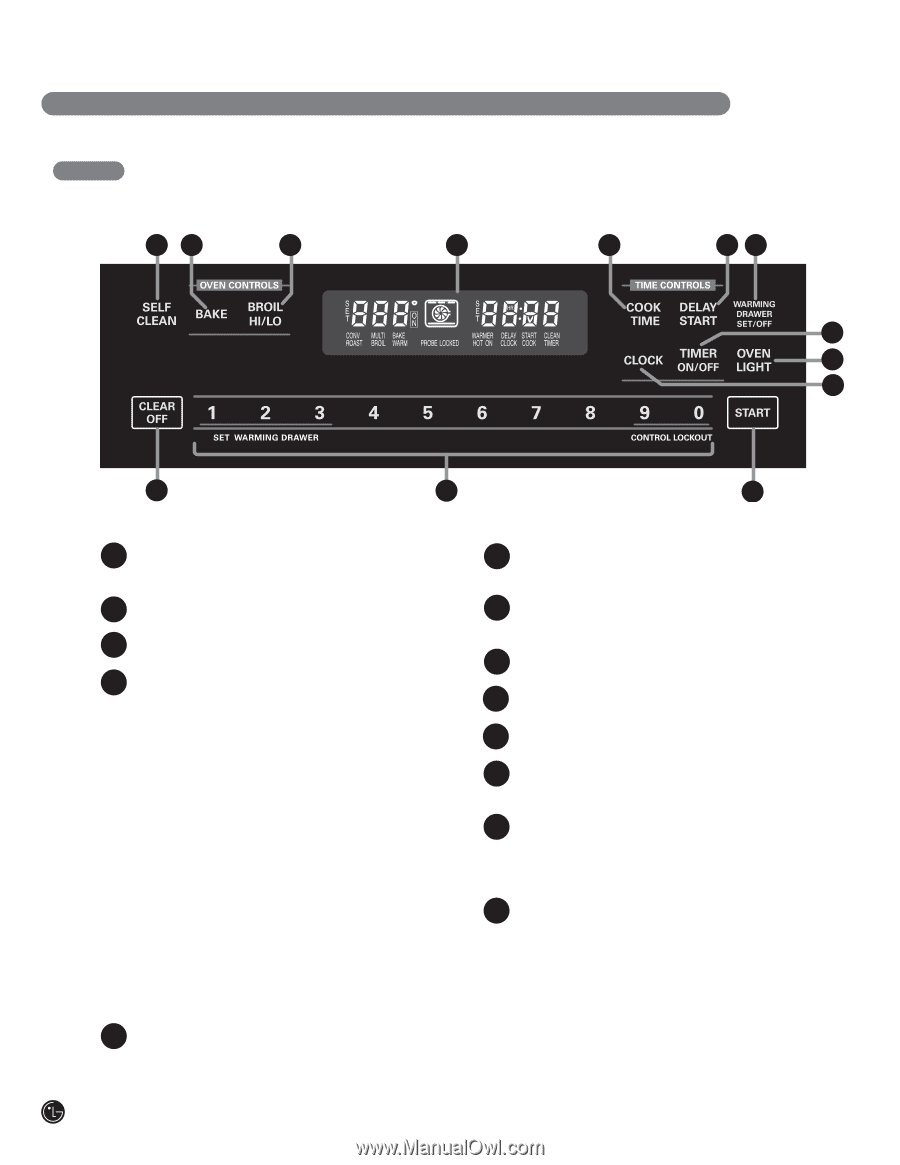
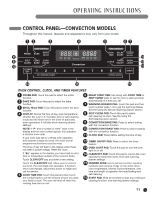
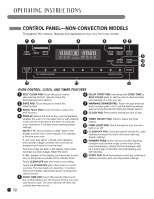
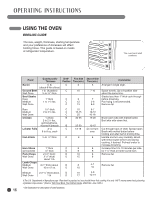
OPERATING INSTRUCTIONS CONTROL PANEL-NON-CONVECTION MODELS Throughout this manual, features and appearance may vary from your model. 12 3 4 5 67 9 10 8 11 12 13 OVEN CONTROL, CLOCK, AND TIMER FEATURES 1 SELF CLEAN PAD: Touch this pad to select self-cleaning function. See the Using the Self-Cleaning Oven section. 2 BAKE PAD: Touch this pad to select the bake function. 3 BROIL HI/LO PAD: Touch this pad to select the broil function. 4 DISPLAY: Shows the time of day, oven temperature, whether the oven is in the bake, broil or self-cleaning mode and the times set for the timer or automatic oven operations. It will also show warming drawer settings. NOTE: If "F- and a number or letter" flash in the display and the oven control signals, this indicates a function error code. If your oven was set for a timed oven operation and a power outage occurred, the clock and all programmed functions must be reset. The time of day will flash in the display when there has been a power outage. Reset the clock. If "Err" appears in the display, you have tried to set a time or temperature outside of the control's limits. Touch CLEAR/OFF pad and enter a new setting. Touch the CLEAR/OFF pad. Allow oven to cool for one hour. Put oven back into operation. If function error code repeats, disconnect power to range and call for service. 5 COOK TIME PAD: Touch this pad and then touch the number pads to set the amount of time you want your food to cook. The oven will shut off when the cooking time has run out. 6 DELAY START PAD: Use along with COOK TIME or SELF CLEAN pads to set the oven to start and stop automatically at a time you set. 7 WARMING DRAWER PAD: Touch this pad and then touch number pads 1-3 to use the warming drawer. See the Using the Electric Warming Drawer section. 8 CLOCK PAD: Press before setting the time of day. 9 TIMER ON/OFF PAD: Press to select the timer feature. 10 OVEN LIGHT PAD: Touch this pad to turn the oven light on or off. 11 CLEAR/OFF PAD: Touch this pad to cancel ALL oven operations except the clock, timer and warming drawer settings. 12 NUMBER PADS: Use to set any function requiring numbers such as time of day on the clock, timer, oven temperature, internal food temperature, start time and length of operation for timed baking and self-cleaning. 13 START PAD: Must be touched to start any cooking or cleaning function, and warming drawer settings. 12
-
 1
1 -
2
-
3
-
4
-
5
-
6
-
 7
7 -
 8
8 -
 9
9 -
 10
10 -
 11
11 -
 12
12 -
 13
13 -
 14
14 -
 15
15 -
 16
16 -
 17
17 -
18
-
19
-
20
-
21
-
22
-
23
-
24
-
25
-
26
-
27
-
28
-
29
-
30
-
31
-
32
-
33
-
34
-
35
-
36
-
37
-
38
-
39
-
40
-
41
-
42
-
43
-
44
-
45
-
46
-
47
-
48
 |
 |