LG LTWS24223S Owners Manual - Page 21
Refrigerator Care And Cleaning, About The Automatic Ice Maker, Warning
 |
View all LG LTWS24223S manuals
Add to My Manuals
Save this manual to your list of manuals |
Page 21 highlights
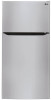
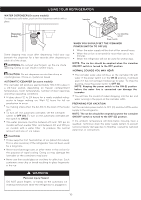
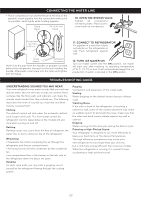
REFRREIGFRERIGAETROARTOCARRCEAARNEDANCLDECALNEIANNGING WHEN MOVING If you decide to take your refrigerator with you when moving, consider the following: 1. Remove all of the food from it, and place the frozen food in an ice chest with dry ice. 2.Unplug your refrigerator. 3.Empty the water from its tray. 4.Clean and dry it with a rag. 5.Pull out all of the removable parts, and wrap them with adhesive tape. 6.Depending on the model of the refrigerator, lift the top part of the refrigerator so it can roll with ease, or screw the levelers so it won´t scratch the floor. Consult to the section "Closing and Aligning Doors". 7. Keep the doors closed with the cable glued to the refrigerator cabinet with an adhesive tape. When your refrigerator arrives to your home, put everything back into place and read the section "Refrigerator Installation" in order to obtain installation preparation. In case your refrigerator has a factory ice maker, remember you have to reconnect the water supply. ABOUT THE AUTOMATIC ICE MAKER NOTE: The automatic Ice maker is only included in some models. Check your specifications of your refrigerator. WARNING PERSONAL INJURY HAZARD Avoid contact with any moving parts of the ejector mechanism or with the heater that releases the ice cubes. DO NOT place your fingers in the automatic ice maker when the refrigerator is plugged in. OPERATING INSTRUCTIONS After turning on your refrigerator, the ice will start to be made between 12 and 24 hours. Identify your ice maker type. Type 1 Icemaker Ice detecting sensor Power Switch The ice maker produces 8 cubes per cycle (between 64 and 128 cubes in a 24 hour period), depending on the temperature of the freezer, the times in which the door opens, and other using conditions (amount of food in the freezer, etc). If the refrigerator is used before the connection of water to the ice maker was performed, you must turn its dial to O (off). When the water connections are performed, turn its dial to I (on). The ice maker will fill up (and start making ice) between 12 and 24 hours after the refrigerator is turned on. Throw away the first batch of ice. Make sure that nothing interferes with the sensor. When the ice reaches the sensor, the ice maker will stop to make ice immediately. It's normal that some ice gets stuck. If the ice is not used frequently, the older cubes of ice will be opaque in color, smaller, and with a strange flavor. NOTE: Never store beverage cans or other items in the ice bin for the purpose of rapid cooling. Doing so may damage the ice maker or the container may burst. YOU MUST TURN THE SWITCH TO O (OFF) When the water supply is interrupted for many hours. When the ice container is left out of its place for more than one or two minutes. When the refrigerator will not be in use for various days. NORMAL SOUNDS The valve will emit a buzzing sound when the ice maker is full of water. If the switch is placed in the on position the buzz will still be heard even when the water pipe has not been connected. To avoid this sound, move switch to O (off) position. NOTE: The ice maker can get damaged if the switch is kept in the ON position before the water pipe has been connected. While the ice maker is filling up with water and producing ice, you will hear the sound of the ice falling and water flowing through the pipes. You will hear the sound of cubes dropping into the bin and water running in the pipes as the icemaker refills. PREPARING FOR VACATIONS Move the ice maker switch to the O (off) position and cut the flow of water going into the refrigerator. If room temperature is at freezing point, have a specialized technician drain the flow of water from the inner pipes (certain models) to avoid broken pipe related damage. NOTE: To avoid water spilling, the unit should be leveled and placed on even floor. Do not remove the ice bin from the ice maker for a long period, doing so may cause ice spilling. 19
-
 1
1 -
2
-
3
-
4
-
5
-
6
-
7
-
8
-
9
-
10
-
11
-
12
-
13
-
14
-
15
-
 16
16 -
 17
17 -
 18
18 -
 19
19 -
 20
20 -
 21
21 -
 22
22 -
 23
23 -
 24
24 -
 25
25 -
 26
26 -
27
-
28
-
29
-
30
-
31
-
32
-
33
-
34
-
35
-
36
-
37
-
38
-
39
-
40
-
41
-
42
-
43
-
44
-
45
-
46
-
47
-
48
-
49
-
50
-
51
-
52
-
53
-
54
-
55
-
56
-
57
-
58
-
59
-
60
-
61
-
62
-
63
-
64
-
65
-
66
-
67
-
68
-
69
-
70
-
71
-
72
-
73
-
74
-
75
-
76
-
77
-
78
-
79
-
80
-
81
-
82
-
83
-
84
-
85
-
86
-
87
-
88
-
89
-
90
-
91
-
92
-
93
-
94
-
95
-
96
-
97
-
98
-
99
-
100
-
101
 |
 |