LG MHES1738F Owners Manual - Page 9
Grounding Instructions
 |
View all LG MHES1738F manuals
Add to My Manuals
Save this manual to your list of manuals |
Page 9 highlights
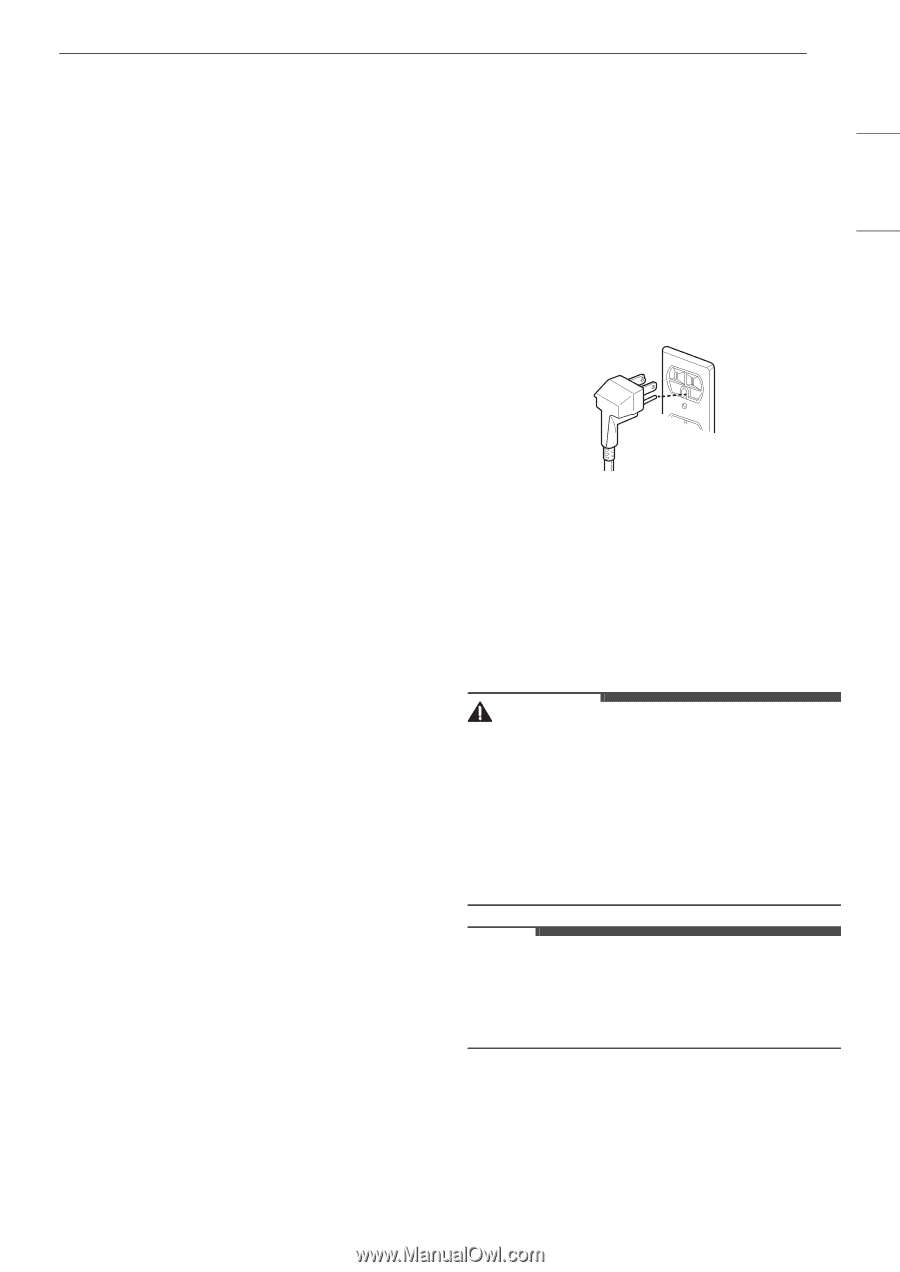
ENGLISH constructed of a minimum of 2" x 4" wood studding and 3/8" thick drywall or plaster/lath. • Attach the 2 lag screws supporting the oven to a vertical, 2" x 4" wall stud. • DO NOT mount the microwave oven to an island or peninsula cabinet. • Be sure that the upper cabinet and rear wall structures can support 150 lb. plus the weight of any items you place inside the oven or upper cabinet. • Locate the oven away from areas with strong drafts, such as near windows, doors, and large heating vents. • Make sure that you have enough space. See the clearance diagrams in the installation manual for the minimum vertical and horizontal clearances. • Refer to the Installation Instructions for details. Electrical Requirements The oven is designed to operate on a standard 120 V/60 Hz household outlet. Be sure that the circuit is at least 15 A or 20 A and the microwave oven is the only appliance on the circuit. It is not designed for 50 Hz or any circuit other than a 120 V/60 Hz circuit. No other electrical appliances or lighting circuits should be on this line. If in doubt, consult a licensed electrician. Voltage Warning The voltage used at the wall socket must be the same as specified on the oven name plate located on the back or on the side of the control panel of the oven. Using a higher voltage is dangerous and may result in a fire or other type of accident causing oven damage. Low voltage will cause slow cooking. If the microwave oven does not perform normally in spite of proper voltage, unplug and reconnect the power cord. Do Not Block Air Vents All air vents should be kept clear during cooking. If air vents are covered during oven operation the oven may overheat. To prevent damage to the oven, a sensitive safety device detects overheating and automatically turns the oven off. The oven cannot be used until it has cooled sufficiently. INSTALLATION 9 grounding plug. The plug must be plugged into an outlet that is properly installed and grounded. • Consult a qualified electrician or service person if the grounding instructions are not completely understood, or if doubt exists as to whether the appliance is properly grounded. - Do not use an extension cord. If the power supply cord is too short, have a qualified electrician or serviceman install an outlet near the appliance. • Ensure that the product is properly grounded before use. • Keep the electrical power cord dry and do not pinch or crush it in any way. • For a permanently connected appliance: This appliance must be connected to a grounded, metallic, permanent wiring system, or an equipment grounding conductor should be run with the circuit conductors and connected to the equipment grounding terminal or lead on the appliance. WARNING • Improper use of the grounding can result in a risk of electric shock. • Do not use extension cord. If the power supply cord is too short, have a qualified electrician or service man install an outlet near the appliance. • A short power supply cord is provided to reduce the risks resulting from becoming entangled in or tripping over a longer cord. NOTE • Because this appliance fits under the cabinet, it has a short power supply cord. See the separate installation instructions for directions on properly placing the cord. Grounding Instructions This appliance must be grounded. In the event of an electrical short circuit, grounding reduces the risk of electric shock by providing an escape wire for the electric current. This appliance is equipped with a cord having a grounding wire with a
-
 1
1 -
2
-
3
-
 4
4 -
 5
5 -
 6
6 -
 7
7 -
 8
8 -
 9
9 -
 10
10 -
 11
11 -
 12
12 -
 13
13 -
 14
14 -
15
-
16
-
17
-
18
-
19
-
20
-
21
-
22
-
23
-
24
-
25
-
26
-
27
-
28
-
29
-
30
-
31
-
32
-
33
-
34
-
35
-
36
-
37
-
38
-
39
-
40
-
41
-
42
-
43
-
44
-
45
-
46
-
47
-
48
 |
 |