Lantronix Micro Embedded Integration Kit (EIK) - User Guide - Page 9
Getting Started, Physically Connecting the Unit, Required Information - 100
 |
View all Lantronix Micro manuals
Add to My Manuals
Save this manual to your list of manuals |
Page 9 highlights
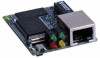
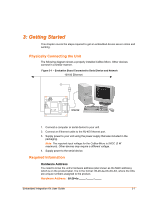
3: Getting Started This chapter covers the steps required to get an embedded device server online and working. Physically Connecting the Unit The following diagram shows a properly installed CoBox-Micro. Other devices connect in a similar manner. Figure 3-1 - Evaluation Board Connected to Serial Device and Network 10/100 Ethernet +5 J 1 CON2 RS232 1. Connect a computer or serial device to your unit. 2. Connect an Ethernet cable to the RJ-45 Ethernet port. 3. Supply power to your unit using the power supply that was included in the packaging. Note: The required input voltage for the CoBox-Micro is 5VDC (3 W maximum). Other devices may require a different voltage. 4. Supply power to the serial device. Required Information Hardware Address You need to know the unit's hardware address (also known as the MAC address), which is on the product label. It is in the format: 00-20-4a-XX-XX-XX, where the XXs are unique numbers assigned to the product. Hardware Address: 00-20-4a Embedded Integration Kit User Guide 3-1
-
 1
1 -
2
-
3
-
 4
4 -
 5
5 -
 6
6 -
 7
7 -
 8
8 -
 9
9 -
 10
10 -
 11
11 -
 12
12 -
 13
13 -
 14
14 -
15
-
16
-
17
-
18
-
19
-
20
-
21
-
22
-
23
-
24
-
25
-
26
-
27
-
28
-
29
-
30
-
31
-
32
-
33
-
34
-
35
-
36
-
37
-
38
-
39
-
40
-
41
-
42
-
43
-
44
-
45
 |
 |
