Lenovo 55Y9003 User Guide - Page 11
Installing the ThinkPad USB Keyboard with TrackPoint, Installing the device driver
 |
UPC - 884343924588
View all Lenovo 55Y9003 manuals
Add to My Manuals
Save this manual to your list of manuals |
Page 11 highlights
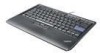
Chapter 2. Installing the ThinkPad USB Keyboard with TrackPoint This chapter provides information about installing the ThinkPad USB Keyboard with TrackPoint and the device driver. Note: Be sure to install the ThinkPad USB Keyboard with TrackPoint before installing the device driver. Installing the ThinkPad USB Keyboard with TrackPoint To install the ThinkPad USB Keyboard with TrackPoint, do the following: 1. Adjust the tilt feet to set the keyboard near your computer to your preference. 2. Connect the keyboard cable to an available USB connector on your computer, as shown: Note: Route the keyboard cable into the cable slot if necessary. After the operating system identifies the keyboard, the keyboard will be ready for use. Note: For the ergonomic information on Lenovo products, go to: http://www.pc.ibm.com/ww/healthycomputing/index.html Installing the device driver Notes: 1. Be sure to install the ThinkPad USB Keyboard with TrackPoint driver (hereafter called the device driver). Otherwise, some functions of the ThinkPad USB Keyboard with TrackPoint will not work correctly. 2. For the latest version of the device driver, go to: http://www.lenovo.com/think/support To install the device driver, do the following: 1. Save any open documents and exit all applications. 2. Insert the Software and User Guide CD and do one of the following: v If the Software and User Guide CD starts automatically, go to step 3. v If the Software and User Guide CD does not start automatically, do the following: a. Click Start → Run. b. Type x:\launch.bat where x is the drive letter of the CD or DVD drive. c. Click OK. The CD browser window opens. 3. On the left side of the window, click Software. © Copyright Lenovo 2009 5
-
 1
1 -
2
-
3
-
4
-
5
-
 6
6 -
 7
7 -
 8
8 -
 9
9 -
 10
10 -
 11
11 -
 12
12 -
 13
13 -
 14
14 -
 15
15 -
 16
16 -
17
-
18
-
19
-
20
-
21
-
22
-
23
-
24
-
25
-
26
-
27
-
28
-
29
-
30
-
31
-
32
-
33
-
34
-
35
-
36
-
37
-
38
-
39
-
40
-
41
-
42
-
43
-
44
 |
 |
