Lenovo H330 Lenovo H3 Series Hardware Maintenance Manual V2.0 - Page 46
Important, To avoid damaging the microprocessor contacts, do not tilt the, microprocessor when
 |
View all Lenovo H330 manuals
Add to My Manuals
Save this manual to your list of manuals |
Page 46 highlights
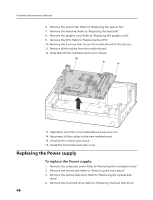
Hardware Maintenance Manual 9. Holding the microprocessor with your fingers, remove the protective cover that protects the gold contacts on the new microprocessor . 10. Holding the microprocessor with your fingers, position the microprocessor so that the notches on the microprocessor are aligned with the tabs in the microprocessor socket. Important To avoid damaging the microprocessor contacts, do not tilt the microprocessor when installing it into the socket. 11. Lower the microprocessor straight down into the system board socket of the system board. 12. To secure the microprocessor in the socket, close the microprocessor retainer and lock it into position with the small handle. 44
-
 1
1 -
2
-
3
-
4
-
5
-
6
-
7
-
8
-
9
-
10
-
11
-
12
-
13
-
14
-
15
-
16
-
17
-
18
-
19
-
20
-
21
-
22
-
23
-
24
-
25
-
26
-
27
-
28
-
29
-
30
-
31
-
32
-
33
-
34
-
35
-
36
-
37
-
38
-
39
-
40
-
 41
41 -
 42
42 -
 43
43 -
 44
44 -
 45
45 -
 46
46 -
 47
47 -
 48
48 -
 49
49 -
 50
50 -
 51
51 -
52
-
53
-
54
-
55
-
56
 |
 |

Hardware Maintenance Manual
44
9.
Holding the microprocessor with your fingers, remove the protective
cover
that protects the gold contacts on the new microprocessor
.
10. Holding the microprocessor with your fingers, position the
microprocessor so that the notches on the microprocessor are aligned
with the tabs in the microprocessor socket.
Important
To avoid damaging the microprocessor contacts, do not tilt the
microprocessor when installing it into the socket.
11. Lower the microprocessor straight down into the system board socket
of the system board.
12. To secure the microprocessor in the socket, close the microprocessor
retainer and lock it into position with the small handle.