Lenovo H330 Lenovo H3 Series Hardware Maintenance Manual V2.0 - Page 47
Replacing the graphic card - graphics card
 |
View all Lenovo H330 manuals
Add to My Manuals
Save this manual to your list of manuals |
Page 47 highlights
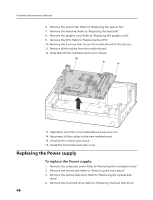
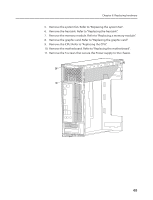
Chapter 8. Replacing hardware 13. Use the thermal grease syringe to place five drops of grease on the top of the microprocessor. Each drop of grease should be 0.03ml (3 tick marks on the grease syringe). 14. Install all the relative parts back. 15. Reattach all the cables back to the motherboard. 16. Install the front bezel and computer cover. Replacing the graphic card To replace the graphic card: 1. Remove the computer cover. Refer to "Removing the computer cover". 2. Remove the screw that secures the graphic card to the chassis. 3. Lift up then slide the graphic card out of chassis. 4. Align then insert the new graphic card and screw it in. 5. Install the computer cover. 45
-
 1
1 -
2
-
3
-
4
-
5
-
6
-
7
-
8
-
9
-
10
-
11
-
12
-
13
-
14
-
15
-
16
-
17
-
18
-
19
-
20
-
21
-
22
-
23
-
24
-
25
-
26
-
27
-
28
-
29
-
30
-
31
-
32
-
33
-
34
-
35
-
36
-
37
-
38
-
39
-
40
-
41
-
 42
42 -
 43
43 -
 44
44 -
 45
45 -
 46
46 -
 47
47 -
 48
48 -
 49
49 -
 50
50 -
 51
51 -
 52
52 -
53
-
54
-
55
-
56
 |
 |

Chapter 8. Replacing hardware
45
13. Use the thermal grease syringe to place five drops of grease on the
top of the microprocessor. Each drop of grease should be 0.03ml (3
tick marks on the grease syringe).
14. Install all the relative parts back.
15. Reattach all the cables back to the motherboard.
16. Install the front bezel and computer cover.
Replacing the graphic card
To replace the graphic card:
1.
Remove the computer cover. Refer to “Removing the computer cover”.
2.
Remove the screw that secures the graphic card to the chassis.
3.
Lift up then slide the graphic card out of chassis.
4.
Align then insert the new graphic card and screw it in.
5.
Install the computer cover.