Lenovo Horizon 27 Table PC IdeaCentre Horizon 27 All-In-One PC Hardware Mainte - Page 37
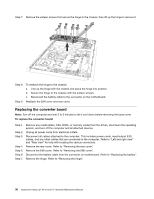
Secure the new hard disk drive to the bracket with the four screws.
 |
View all Lenovo Horizon 27 Table PC manuals
Add to My Manuals
Save this manual to your list of manuals |
Page 37 highlights
Step 6. Remove the two screws that secure the hard disk drive to the chassis. Step 7. Disconnect the data and power cables from the hard disk drive, then lift up the hard disk drive to remove it. Step 8. Remove the four screws that secure the hard disk drive to the bracket. Step 9. Slide the hard disk drive out of the bracket. Step 10. Install the new hard disk drive as follows: a. Slide the new hard disk drive into the bracket. b. Secure the new hard disk drive to the bracket with the four screws. c. Connect the data and power cables to the new hard disk drive. d. Secure the new hard disk drive and bracket to the chassis with the two screws. e. Reconnect the battery cable to the connector on the motherboard. Step 11. Reattach the rear cover. Chapter 8. Replacing hardware 31
-
 1
1 -
2
-
3
-
4
-
5
-
6
-
7
-
8
-
9
-
10
-
11
-
12
-
13
-
14
-
15
-
16
-
17
-
18
-
19
-
20
-
21
-
22
-
23
-
24
-
25
-
26
-
27
-
28
-
29
-
30
-
31
-
 32
32 -
 33
33 -
 34
34 -
 35
35 -
 36
36 -
 37
37 -
 38
38 -
 39
39 -
 40
40 -
 41
41 -
 42
42 -
43
-
44
-
45
-
46
-
47
-
48
-
49
-
50
-
51
-
52
-
53
-
54
-
55
 |
 |
