Lenovo IdeaCentre A300 IdeaCentre A300 Hardware Maintenance Manual - Page 47
Replacing the camera
 |
View all Lenovo IdeaCentre A300 manuals
Add to My Manuals
Save this manual to your list of manuals |
Page 47 highlights
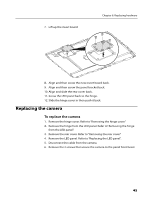
7. Lift up the invert board. Chapter 8. Replacing hardware 8. Align and then screw the new invert board back. 9. Align and then screw the panel bracket back. 10. Align and slide the rear cover back. 11. Screw the LED panel back to the hinge. 12. Slide the hinge cover in then push it back. Replacing the camera To replace the camera 1. Remove the hinge cover. Refer to "Removing the hinge cover." 2. Remove the hinge from the LED panel. Refer to" Removing the hinge from the LED panel". 3. Remove the rear cover. Refer to "Removing the rear cover". 4. Remove the LED panel. Refer to "Replacing the LED panel". 5. Disconnect the cable from the camera. 6. Remove the 2 screws that secure the camera to the panel front bezel. 45
-
 1
1 -
2
-
3
-
4
-
5
-
6
-
7
-
8
-
9
-
10
-
11
-
12
-
13
-
14
-
15
-
16
-
17
-
18
-
19
-
20
-
21
-
22
-
23
-
24
-
25
-
26
-
27
-
28
-
29
-
30
-
31
-
32
-
33
-
34
-
35
-
36
-
37
-
38
-
39
-
40
-
41
-
 42
42 -
 43
43 -
 44
44 -
 45
45 -
 46
46 -
 47
47 -
 48
48 -
 49
49 -
 50
50 -
 51
51 -
 52
52 -
53
 |
 |

Chapter 8. Replacing hardware
45
7.
Lift up the invert board.
8.
Align and then screw the new invert board back.
9.
Align and then screw the panel bracket back.
10. Align and slide the rear cover back.
11. Screw the LED panel back to the hinge.
12. Slide the hinge cover in then push it back.
Replacing the camera
To replace the camera
1.
Remove the hinge cover. Refer to “Removing the hinge cover.”
2.
Remove the hinge from the LED panel. Refer to” Removing the hinge
from the LED panel”.
3.
Remove the rear cover. Refer to “Removing the rear cover”.
4.
Remove the LED panel. Refer to “Replacing the LED panel”.
5.
Disconnect the cable from the camera.
6.
Remove the 2 screws that secure the camera to the panel front bezel.