Lenovo S40-40 Lenovo S40-40 Hardware Maintenance Manual
Lenovo S40-40 Manual
 |
View all Lenovo S40-40 manuals
Add to My Manuals
Save this manual to your list of manuals |
Lenovo S40-40 manual content summary:
- Lenovo S40-40 | Lenovo S40-40 Hardware Maintenance Manual - Page 1
Lenovo S40-40Hardware Maintenance Manual Machine Types: F0AX [S40-40] - Lenovo S40-40 | Lenovo S40-40 Hardware Maintenance Manual - Page 2
- Lenovo S40-40 | Lenovo S40-40 Hardware Maintenance Manual - Page 3
Lenovo S40-40 Hardware Maintenance Manual Machine Types: F0AX [S40-40] - Lenovo S40-40 | Lenovo S40-40 Hardware Maintenance Manual - Page 4
First Edition (June 2014)13th © Copyright Lenovo 2014. LIMITED AND RESTRICTED RIGHTS NOTICE: If data or software are delivered pursuant a General Services Administration "GSA" contract, use, reproduction, or disclosure is subject to restrictions set forth in Contract No. GS-35F-05925 - Lenovo S40-40 | Lenovo S40-40 Hardware Maintenance Manual - Page 5
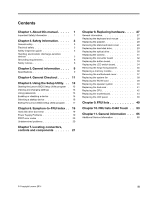
inspection guide 5 Handling electrostatic discharge-sensitive devices 5 Grounding requirements 6 Safety notices 6 Chapter 3. General information . . . . 9 Specifications 9 Chapter 4. General Checkout . . . . . 11 Chapter 5. Using the Setup Utility. . . 13 Starting the Lenovo BIOS Setup Utility - Lenovo S40-40 | Lenovo S40-40 Hardware Maintenance Manual - Page 6
iv Lenovo S40-40Hardware Maintenance Manual - Lenovo S40-40 | Lenovo S40-40 Hardware Maintenance Manual - Page 7
manual This manual contains service and reference information for Lenovo S40-40 All-In-One computers listed on the cover. It is intended only for trained servicers who are familiar with Lenovo computer products. Before servicing a Lenovo this manual before following any of the instructions. Veuillez - Lenovo S40-40 | Lenovo S40-40 Hardware Maintenance Manual - Page 8
2 Lenovo S40-40Hardware Maintenance Manual - Lenovo S40-40 | Lenovo S40-40 Hardware Maintenance Manual - Page 9
familiar with before servicing a computer. the computer, ensure that other service representatives and customer personnel are servicing the computer. • Keep your tool case away from areas that people may walk through to ensure no-one your eyes. • After service, reinstall all safety shields instructed - Lenovo S40-40 | Lenovo S40-40 Hardware Maintenance Manual - Page 10
off the power, if necessary. - Use only one hand when working with powered-on electrical equipment; keep very high voltages; these instructions are in the safety sections and damage to the computer. • Do not service the following parts with the power on when Lenovo S40-40Hardware Maintenance Manual - Lenovo S40-40 | Lenovo S40-40 Hardware Maintenance Manual - Page 11
to protect users and service personnel from injury. This guide addresses only those items. can continue without first resolving the problem. Consider the following items and the are all at the same charge. Notes: 1. Use product-specific ESD procedures when they exceed the requirements noted here. 2. - Lenovo S40-40 | Lenovo S40-40 Hardware Maintenance Manual - Page 12
specific service , use one hand only instructed otherwise in the installation and configuration procedures. • Connect and disconnect cables as described in the following table when installing, moving, or opening covers on this product or attached devices. 6 Lenovo S40-40Hardware Maintenance Manual - Lenovo S40-40 | Lenovo S40-40 Hardware Maintenance Manual - Page 13
: • Do not remove the covers. Removing the covers of the laser product could result in exposure to hazardous laser radiation. There are no serviceable parts inside the device. • Use of controls or adjustments or performance of procedures other than those specified herein might result in hazardous - Lenovo S40-40 | Lenovo S40-40 Hardware Maintenance Manual - Page 14
the power switch on the power supply do not turn off the electrical current supplied to the device. The device also might have more than one power cord. To remove all electrical current from the device, ensure that all power cords are disconnected from the power source. CAUTION: Do not place - Lenovo S40-40 | Lenovo S40-40 Hardware Maintenance Manual - Page 15
all computer models covered by this manual. Specifications This section lists the physical specifications for your computer. This section lists the physical specifications for your computer. Type Lenovo S40-40 This section lists the physical specifications. Environment Air temperature: Operating: 10 - Lenovo S40-40 | Lenovo S40-40 Hardware Maintenance Manual - Page 16
10 Lenovo S40-40Hardware Maintenance Manual - Lenovo S40-40 | Lenovo S40-40 Hardware Maintenance Manual - Page 17
computer you are servicing might have been incorrect drive. General error messages appear if a problem or conflict is found by an application, the operating correct response, proceed to step 7. 6. If one of the following happens, follow the instruction given: • If the computer displays a POST error - Lenovo S40-40 | Lenovo S40-40 Hardware Maintenance Manual - Page 18
12 Lenovo S40-40Hardware Maintenance Manual - Lenovo S40-40 | Lenovo S40-40 Hardware Maintenance Manual - Page 19
procedure, shut down the operating system and turn off the computer. 2. Press and hold the F1 key then turn on the computer. When the Lenovo BIOS Setup Utility program is displayed, release the F1 key. Note: If a Power-On Password or an Administrator Password has been set, the Setup Utility program - Lenovo S40-40 | Lenovo S40-40 Hardware Maintenance Manual - Page 20
, you cannot start the Lenovo BIOS Setup Utility program until a valid password is typed from the keyboard. Setting, changing, or deleting a Power-On Password Note: A password can be any combination of letters and numbers up to 16 characters (a-z and 0-9). 14 Lenovo S40-40Hardware Maintenance Manual - Lenovo S40-40 | Lenovo S40-40 Hardware Maintenance Manual - Page 21
. To change a Power-On Password, do the following: 1. Start the Lenovo BIOS Setup Utility program (See "Starting the Lenovo BIOS Setup Utility program" on page 13.) 2. From the Security menu, select Set Power-On Password and press the Enter key. 3. The password dialog box will be displayed. Type the - Lenovo S40-40 | Lenovo S40-40 Hardware Maintenance Manual - Page 22
Enter key. 5. Return to the Lenovo BIOS Setup Utility program menu and select the Exit option. 6. Select Save changes and Exit from the menu. Notes: a. If you do not want to save the settings, select Discard changes and Exit from the menu. b. Select IDE/AHCI Mode: Device driver support is required - Lenovo S40-40 | Lenovo S40-40 Hardware Maintenance Manual - Page 23
Setup Utility program After you finish viewing or changing settings, press the Esc key to return to the Lenovo BIOS Setup Utility program main menu. You might have to press the Esc key several times. Do one of the following: • If you want to save the new settings, select Save changes and Exit from - Lenovo S40-40 | Lenovo S40-40 Hardware Maintenance Manual - Page 24
18 Lenovo S40-40Hardware Maintenance Manual - Lenovo S40-40 | Lenovo S40-40 Hardware Maintenance Manual - Page 25
be used to help you decide which FRUs to have available when servicing a computer. If you are unable to correct the problem using this index, go to "Undetermined problems" on page 20. Notes: • If you have both an . FRU/Action Reseat connectors Power Cord Power-on Switch © Copyright Lenovo 2014 19 - Lenovo S40-40 | Lenovo S40-40 Hardware Maintenance Manual - Page 26
and that no keys are held pressed BIOS then ignores the missing keyboard during POST. The BIOS problems 1. Power-off the computer. 2. Remove or disconnect the following components (if connected or installed) one problem continues, replace the system board. 20 Lenovo S40-40Hardware Maintenance Manual - Lenovo S40-40 | Lenovo S40-40 Hardware Maintenance Manual - Page 27
7. Left direction button 8. Right direction button 9. Monitor On/Off button 10. Built-in IR receiver (Only functional on models equipped with a IR receiver module) © Copyright Lenovo 2014 21 - Lenovo S40-40 | Lenovo S40-40 Hardware Maintenance Manual - Page 28
connector 4. USB connector 5. Memory card reader 6. Power button 7. Optical drive eject button 8. Optical drive Attention: Do not insert 3-inch discs into the optical drive. 22 Lenovo S40-40Hardware Maintenance Manual - Lenovo S40-40 | Lenovo S40-40 Hardware Maintenance Manual - Page 29
Rear view The following illustration shows the location of connectors and components on the rear of the computer. 1. TV tuner connector (selected models only, 2 connectors 6. USB connector for Japan) 2. TV tuner connector (selected models only, 2 connectors 7. HDMI-out connector (selected models - Lenovo S40-40 | Lenovo S40-40 Hardware Maintenance Manual - Page 30
17. Hard disk drive and bay 18. Converter board 19. Front function board 20. Optical drive 21. Optical drive bracket 22. Touch control board 24 Lenovo S40-40Hardware Maintenance Manual - Lenovo S40-40 | Lenovo S40-40 Hardware Maintenance Manual - Page 31
main circuit board in your computer. It provides basic computing functions and supports a variety of devices that are factory-installed or that you can disk drive power connector 20. Optical drive SATA connector 21. Optical driver power connector 22. LVDS connector 23. Camera connector 24. System - Lenovo S40-40 | Lenovo S40-40 Hardware Maintenance Manual - Page 32
26 Lenovo S40-40Hardware Maintenance Manual - Lenovo S40-40 | Lenovo S40-40 Hardware Maintenance Manual - Page 33
with your computer. To obtain copies of the Safety and Warranty Guide, go to the Support Web site at: http://consumersupport.lenovo.com. Note: Use only parts provided by Lenovo. General information Pre-disassembly instructions Before starting the disassembly procedure, make sure that you do the - Lenovo S40-40 | Lenovo S40-40 Hardware Maintenance Manual - Page 34
It may be helpful to place the computer face-down on a soft flat surface for this procedure. Lenovo recommends that you use a blanket, towel, or other soft cloth to protect the touch screen from scratches 2. Unplug all power cords from electrical outlets. 28 Lenovo S40-40Hardware Maintenance Manual - Lenovo S40-40 | Lenovo S40-40 Hardware Maintenance Manual - Page 35
it cool down before removing the cover. Note: It may be helpful to place the computer face-down on a soft flat surface for this procedure. Lenovo recommends that you use a blanket, towel, or other soft cloth to protect the touch screen from scratches or other damage. Step 1. Step 2. Step 3. Step - Lenovo S40-40 | Lenovo S40-40 Hardware Maintenance Manual - Page 36
: It may be helpful to place the computer face-down on a soft flat surface for this procedure. Lenovo recommends that you use a blanket, towel, or other soft cloth to protect the touch screen from scratches . Refer to "Removing the stand and back cover". 30 Lenovo S40-40Hardware Maintenance Manual - Lenovo S40-40 | Lenovo S40-40 Hardware Maintenance Manual - Page 37
drive to the metal bracket. Step 6. Use a small flat head screw driver to push the right side of optical drive until it comes out of to place the computer face-down on a soft flat surface for this procedure. Lenovo recommends that you use a blanket, towel, or other soft cloth to protect the computer - Lenovo S40-40 | Lenovo S40-40 Hardware Maintenance Manual - Page 38
may be helpful to place the computer face-down on a soft flat surface for this procedure. Lenovo recommends that you use a blanket, towel, or other soft cloth to protect the computer screen from . Refer to "Removing the stand and back cover". 32 Lenovo S40-40Hardware Maintenance Manual - Lenovo S40-40 | Lenovo S40-40 Hardware Maintenance Manual - Page 39
it cool down before removing the cover. Note: It may be helpful to place the computer face-down on a soft flat surface for this procedure. Lenovo recommends that you use a blanket, towel, or other soft cloth to protect the computer screen from scratches or other damage. To replace the power switch - Lenovo S40-40 | Lenovo S40-40 Hardware Maintenance Manual - Page 40
the computer screen from scratches or other damage. To replace the LCD switch board: Note: The following instructions are for C440 touch models only. Step 1. Step 2. Step 3. Step 4. Remove any media (disks "Removing the stand base and back cover". 34 Lenovo S40-40Hardware Maintenance Manual - Lenovo S40-40 | Lenovo S40-40 Hardware Maintenance Manual - Page 41
it cool down before removing the cover. Note: It may be helpful to place the computer face-down on a soft flat surface for this procedure. Lenovo recommends that you use a blanket, towel, or other soft cloth to protect the computer screen from scratches or other damage. To replace the hinge fixing - Lenovo S40-40 | Lenovo S40-40 Hardware Maintenance Manual - Page 42
: It may be helpful to place the computer face-down on a soft flat surface for this procedure. Lenovo recommends that you use a blanket, towel, or other soft cloth to protect the touch screen from scratches board cover, and then remove memory shielding. 36 Lenovo S40-40Hardware Maintenance Manual - Lenovo S40-40 | Lenovo S40-40 Hardware Maintenance Manual - Page 43
it cool down before removing the cover. Note: It may be helpful to place the computer face-down on a soft flat surface for this procedure. Lenovo recommends that you use a blanket, towel, or other soft cloth to protect the computer screen from scratches or other damage. To replace the motherboard - Lenovo S40-40 | Lenovo S40-40 Hardware Maintenance Manual - Page 44
It may be helpful to place the computer face-down on a soft flat surface for this procedure. Lenovo recommends that you use a blanket, towel, or other soft cloth to protect the computer screen from cover. Refer to "Removing the motherboard cover". 38 Lenovo S40-40Hardware Maintenance Manual - Lenovo S40-40 | Lenovo S40-40 Hardware Maintenance Manual - Page 45
it cool down before removing the cover. Note: It may be helpful to place the computer face-down on a soft flat surface for this procedure. Lenovo recommends that you use a blanket, towel, or other soft cloth to protect the computer screen from scratches or other damage. To replace the WLAN card - Lenovo S40-40 | Lenovo S40-40 Hardware Maintenance Manual - Page 46
be helpful to place the computer face-down on a soft flat surface for this procedure. Lenovo recommends that you use a blanket, towel, or other soft cloth to protect the computer screen from motherboard cover. Refer to "Removing the motherboard cover". 40 Lenovo S40-40Hardware Maintenance Manual - Lenovo S40-40 | Lenovo S40-40 Hardware Maintenance Manual - Page 47
it cool down before removing the cover. Note: It may be helpful to place the computer face-down on a soft flat surface for this procedure. Lenovo recommends that you use a blanket, towel, or other soft cloth to protect the computer screen from scratches or other damage. To replace the heat-sink - Lenovo S40-40 | Lenovo S40-40 Hardware Maintenance Manual - Page 48
It may be helpful to place the computer face-down on a soft flat surface for this procedure. Lenovo recommends that you use a blanket, towel, or other soft cloth to protect the computer screen from scratches heat-sink. Refer to "Replacing the heat sink". 42 Lenovo S40-40Hardware Maintenance Manual - Lenovo S40-40 | Lenovo S40-40 Hardware Maintenance Manual - Page 49
Step 8. Push the small handle and open the retainer. Step 9. Lift the microprocessor straight up and out of the socket. Attention: Do not touch the gold contacts on the bottom of the microprocessor. When handling the microprocessor, touch only the sides. Note: Do not drop anything onto the - Lenovo S40-40 | Lenovo S40-40 Hardware Maintenance Manual - Page 50
cover and stand. Replacing the motherboard Note: Turn off the computer and wait 3 to 5 minutes to let it cool down before removing the cover. 44 Lenovo S40-40Hardware Maintenance Manual - Lenovo S40-40 | Lenovo S40-40 Hardware Maintenance Manual - Page 51
Note: It may be helpful to place the computer face-down on a soft flat surface for this procedure. Lenovo recommends that you use a blanket, towel, or other soft cloth to protect the computer screen from scratches or other damage. To replace the motherboard: Step 1. - Lenovo S40-40 | Lenovo S40-40 Hardware Maintenance Manual - Page 52
It may be helpful to place the computer face-down on a soft flat surface for this procedure. Lenovo recommends that you use a blanket, towel, or other soft cloth to protect the computer screen from scratches . Refer to "Removing the stand and back cover". 46 Lenovo S40-40Hardware Maintenance Manual - Lenovo S40-40 | Lenovo S40-40 Hardware Maintenance Manual - Page 53
Step 5. Remove the hinge fixing bracket. Refer to "Removing the hinge fixing bracket". Step 6. Remove the motherboard cover. Refer to "Removing the motherboard cover". Step 7. Remove the speaker system. Refer to "Replacing the speaker system". Step 8. Remove the camera module. Refer to "Replacing - Lenovo S40-40 | Lenovo S40-40 Hardware Maintenance Manual - Page 54
48 Lenovo S40-40Hardware Maintenance Manual - Lenovo S40-40 | Lenovo S40-40 Hardware Maintenance Manual - Page 55
C340/C440 WIN8_PRO 1G_GPU W/O USB3.0 MB C340/C440 WIN8 512M_GPU W/O USB3.0 MB C340/C440 WIN8_PRO 512M_GPU W/O USB3.0 MB Service Part Number CRU ID ?? ?? ?? ?? 90000624 N 90000626 N 90000841 N 90000842 N 90000844 N 90000845 N 90000847 N 90000848 N 90000850 N 90000851 N 90000853 N 90000854 - Lenovo S40-40 | Lenovo S40-40 Hardware Maintenance Manual - Page 56
SB HMC WiFi card(wowl) LTN RTL8188CE 11n SB HMC WiFi card(wowl) CBT BCM94313 11n HMC WiFi card 13 TV-Tuner card Avermedia H339BB DVB-T Mini TV Card Avermedia H339BA ATSC Mini TV Card 14 System fan C340/C440 AVC Fan C340/C440 Delta Fan 50 Lenovo S40-40Hardware Maintenance Manual 90000862 - Lenovo S40-40 | Lenovo S40-40 Hardware Maintenance Manual - Page 57
15 Heat-sink C340 AVC DIS HeatSink C440 Coolermaster DIS HeatSink C340 AVC UMA HeatSink C440 Coolermaster UMA HeatSink C340 AVC UMA HeatSink C340 Coolermaster UMA HeatSink C340 AVC DIS HeatSink C340 Coolermaster DIS HeatSink 16 Camera Bison M720P VC OV9712 CAM CCY M720P VC OV9712 CAM - Lenovo S40-40 | Lenovo S40-40 Hardware Maintenance Manual - Page 58
52 Lenovo S40-40Hardware Maintenance Manual - Lenovo S40-40 | Lenovo S40-40 Hardware Maintenance Manual - Page 59
90002582 90002583 90002584 90002585 90002645 90002646 90002647 90002648 90002649 90002650 90002651 90002652 90002653 90002654 90002655 90002656 90002657 90002658 90002659 90002660 90002661 90002662 CRU ID N N N N N N N N N N N N N N N N N N N N N N N N © Copyright Lenovo 2014 53 - Lenovo S40-40 | Lenovo S40-40 Hardware Maintenance Manual - Page 60
Boards Other Boards C440 TOUCH Power LED Board W/IR 90002586 N C440 TOUCH Function key Board 90002587 N Converter Board Cable Converter Board Cable C340 AUO Converter to Panel Cable (120W) 90201448 N C440 TOUCH Sigle Mic Wecam Cable 90202553 N 54 Lenovo S40-40Hardware Maintenance Manual - Lenovo S40-40 | Lenovo S40-40 Hardware Maintenance Manual - Page 61
FOR MB 90201450 N C340 ODD LATCH 90201449 N C440 ODD COVER 90201482 N C440 TOUCH Front Bezel(Black) 90202533 N C440 TOUCH Front Bezel(White) 90202534 N C440 TOUCH Rear Cover W/TV W/HDMI(B) 90202535 2 C440 TOUCH Rear Cover W/TV W/O HDMI(B) 90202536 2 C440 TOUCH Rear Cover W/O TV W/HDMI - Lenovo S40-40 | Lenovo S40-40 Hardware Maintenance Manual - Page 62
-PB 2GB D3L-1600S Memory-HF 1100643 N Mic_S D9PFJ 2GB D3-1600S MEMORY 1100646 N Elp_R J2108BDBG-GN-F 2GB D3-1600S MEMORY (RMT3150ED58E8W-1600) 1100425 N 56 Lenovo S40-40Hardware Maintenance Manual - Lenovo S40-40 | Lenovo S40-40 Hardware Maintenance Manual - Page 63
HDD 6GB(2G+4G) 8GB(2*4G) 320G 500G 1T 2T M471B5773DH0-CK0 1100226 N M471B5273DH0-CK0 1100230 N HMT325S6CFR8C-PB 1100227 N HMT351S6CFR8C-PB 1100231 N MT8KTF25664HZ-1G6M1 1100228 N MT16KTF51264HZ-1G6M1 1100232 N M471B5773CHS-CK0 2GB D3-1600S MEMORY 1100614 N M471B5273CH0-CK0 4GB D3- - Lenovo S40-40 | Lenovo S40-40 Hardware Maintenance Manual - Page 64
WiFi card Avermedia H339BB DVB-T Mini TV Card Avermedia H339BA ATSC Mini TV Card Avermedia H334 DVB-T Mini TV Card Avermedia H334 ATSC Mini TV Card Philips Win8 IR remote controller--Black Philips Win8 IR remote controller--White 1 25209128 1 25209129 1 58 Lenovo S40-40Hardware Maintenance Manual - Lenovo S40-40 | Lenovo S40-40 Hardware Maintenance Manual - Page 65
Wireless Keyboard Sunrex EKB-10YA(FR) B-Silk USB KB-LVT8 Sunrex EKB-10YA(GK) B-Silk USB KB-LVT8 Sunrex EKB-10YA(HG) B-Silk USB KB-LVT8 Sunrex EKB-10YA(BG) B-Silk USB KB-LVT8 Sunrex EKB-10YA(HR) B-Silk USB KB-LVT8 Sunrex EKB-10YA(JP) B-Silk USB KB-LVT8 Sunrex EKB-10YA(EN-FR) B-S USB KB-LVT8 Sunrex - Lenovo S40-40 | Lenovo S40-40 Hardware Maintenance Manual - Page 66
4G KB-White8 Liteon SK-8861(SA) 2.4G KB-White8 Liteon SK-8861(CH) 2.4G KB-White8 60 Lenovo S40-40Hardware Maintenance Manual 25209177 2 25209178 2 25209179 2 25209180 2 25209181 2 25209182 2 25209183 2 25209184 2 25209185 2 25209186 2 25209187 2 25209188 2 25209189 2 25209190 2 25209191 2 25209192 - Lenovo S40-40 | Lenovo S40-40 Hardware Maintenance Manual - Page 67
25211016 2 Liteon SM-8861 2.4G Mouse(No Battery)WTE 25211017 2 Liteon SM-8861 2.4G Mouse(MY) White 25211018 2 Liteon SM-8861 2.4G Mouse(JP) White 25211019 2 longwell Black Single-end 1.0m3wire ULCSA Power Cable 31033857 1 Volex 1m C5 US Power Cable 31033858 1 Luxshare1.0m C5 US Power - Lenovo S40-40 | Lenovo S40-40 Hardware Maintenance Manual - Page 68
® Luxshare1.0m C5 Isereal Power Cable 31503362 1 Volex 1m C5 Israel Power Cable 31049502 1 Longwell Black Single-end 1.0m Taiwan C5 Power Cable ® 31038885 1 62 Lenovo S40-40Hardware Maintenance Manual - Lenovo S40-40 | Lenovo S40-40 Hardware Maintenance Manual - Page 69
Luxshare1.0m C5 Taiwan Power Cable 31503354 1 Volex 1m C5 Taiwan Power Cable 31049499 1 Longwell Black Single-end 1.0m Korea C5 Power 31039106 1 Cable ® Luxshare1.0m C5 Korea Power Cable 31503358 1 Volex 1m C5 Korea Power Cable 31049498 1 Longwell Black Single-end 1.0m SA C5 Power Cable ® - Lenovo S40-40 | Lenovo S40-40 Hardware Maintenance Manual - Page 70
64 Lenovo S40-40Hardware Maintenance Manual - Lenovo S40-40 | Lenovo S40-40 Hardware Maintenance Manual - Page 71
manual. Additional Service Information This chapter provides additional information that the service for Advanced Power Management (APM) BIOS mode is ignored. Not all operating systems support ACPI BIOS mode. Automatic Power-On features The wake the System. © Copyright Lenovo 2014 65
-
 1
1 -
 2
2 -
 3
3 -
 4
4 -
 5
5 -
 6
6 -
 7
7 -
8
-
9
-
10
-
11
-
12
-
13
-
14
-
15
-
16
-
17
-
18
-
19
-
20
-
21
-
22
-
23
-
24
-
25
-
26
-
27
-
28
-
29
-
30
-
31
-
32
-
33
-
34
-
35
-
36
-
37
-
38
-
39
-
40
-
41
-
42
-
43
-
44
-
45
-
46
-
47
-
48
-
49
-
50
-
51
-
52
-
53
-
54
-
55
-
56
-
57
-
58
-
59
-
60
-
61
-
62
-
63
-
64
-
65
-
66
-
67
-
68
-
69
-
70
-
71
 |
 |

Lenovo S40–40Hardware Maintenance Manual
Machine Types: F0AX [S40-40]