Lenovo ThinkPad 600 User's Reference Guide for TP 600 - Page 139
Message, Action, Enter, Start, Screen expansion, The Test submenu
 |
View all Lenovo ThinkPad 600 manuals
Add to My Manuals
Save this manual to your list of manuals |
Page 139 highlights
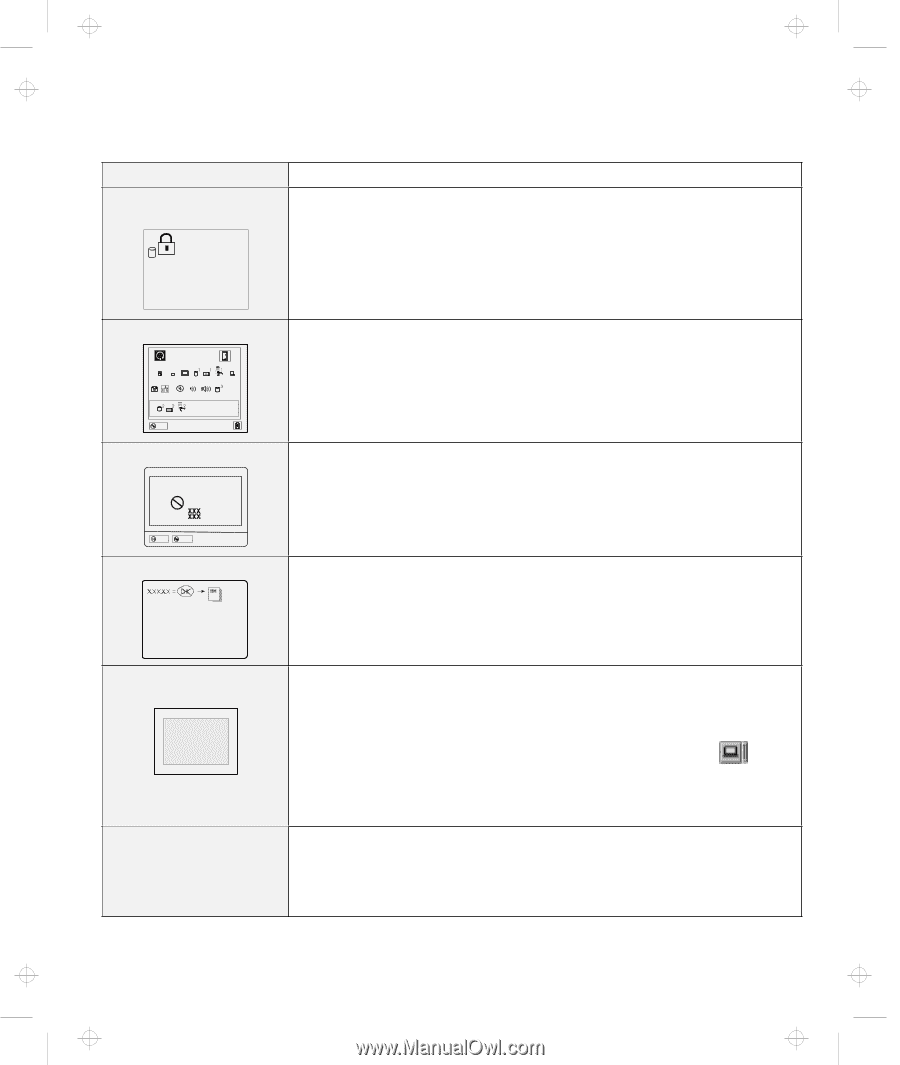
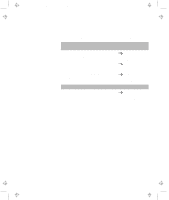
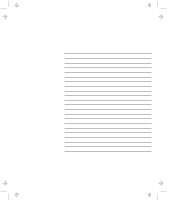
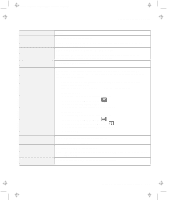
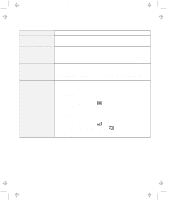
Title: C79EGMST CreationDate: 02/10/98 09:24:42 Troubleshooting Charts Message The hard disk password prompt Action A hard disk drive password is set. Type the correct password and press Enter to use the computer (see page 88). If you still have a problem, have the computer serviced. The "Test" submenu Start Restart SystemBoard Memory Display HDD-1 FDD-1 PCMCIA-1 Parallel Serial DSP CDROM Infrared Audio HDD-3 HDD-2 FDD-2 PCMCIA-2 Exit A POST error prompt ERROR Select the Start icon and follow the instructions to test your system. If you cannot complete the test, have the computer serviced. If the test does not find the problem but the problem persists, see if you can find your problem in the Troubleshooting Charts. If the test ends in an error, note the error code and have the computer serviced. An error was found during POST. Press Enter; then select Start from the "Test" submenu and run the test. If the test ends in an error, note the error code and have the computer serviced. OK Cancel An error prompt Turn off the computer and start Easy-Setup; then select Test to test the computer. If the test ends in an error, note the error code and have the computer serviced. You can start the operating system by pressing F1 instead, and ignore the error. The DOS full-screen looks smaller. 640 x 480 A panel or message that is not listed in the troubleshooting charts. When you use a DOS application that supports only the 640x480 resolution (VGA mode), the screen image might look slightly distorted or might appear smaller than the display size. This is to maintain compatibility with other DOS applications. To expand the screen image to the same size as the actual screen, start the ThinkPad Configuration program and click on LCD ( ); then select the Screen expansion function. (The image might still look slightly distorted.) Note: You can use the Fn+F8 keys to do the same thing. Turn off the computer and start Easy-Setup; then select Test to test the computer. If the test ends in an error, note the error code and have the computer serviced. If you cannot start Easy-Setup, have the computer serviced. Chapter 4. Solving Computer Problems 121
-
 1
1 -
2
-
3
-
4
-
5
-
6
-
7
-
8
-
9
-
10
-
11
-
12
-
13
-
14
-
15
-
16
-
17
-
18
-
19
-
20
-
21
-
22
-
23
-
24
-
25
-
26
-
27
-
28
-
29
-
30
-
31
-
32
-
33
-
34
-
35
-
36
-
37
-
38
-
39
-
40
-
41
-
42
-
43
-
44
-
45
-
46
-
47
-
48
-
49
-
50
-
51
-
52
-
53
-
54
-
55
-
56
-
57
-
58
-
59
-
60
-
61
-
62
-
63
-
64
-
65
-
66
-
67
-
68
-
69
-
70
-
71
-
72
-
73
-
74
-
75
-
76
-
77
-
78
-
79
-
80
-
81
-
82
-
83
-
84
-
85
-
86
-
87
-
88
-
89
-
90
-
91
-
92
-
93
-
94
-
95
-
96
-
97
-
98
-
99
-
100
-
101
-
102
-
103
-
104
-
105
-
106
-
107
-
108
-
109
-
110
-
111
-
112
-
113
-
114
-
115
-
116
-
117
-
118
-
119
-
120
-
121
-
122
-
123
-
124
-
125
-
126
-
127
-
128
-
129
-
130
-
131
-
132
-
133
-
 134
134 -
 135
135 -
 136
136 -
 137
137 -
 138
138 -
 139
139 -
 140
140 -
 141
141 -
 142
142 -
 143
143 -
 144
144 -
145
-
146
-
147
-
148
-
149
-
150
-
151
-
152
-
153
-
154
-
155
-
156
-
157
-
158
-
159
-
160
-
161
-
162
-
163
-
164
-
165
-
166
-
167
-
168
-
169
-
170
-
171
-
172
-
173
-
174
-
175
-
176
-
177
-
178
-
179
-
180
-
181
-
182
-
183
-
184
-
185
-
186
-
187
-
188
-
189
-
190
-
191
-
192
-
193
-
194
-
195
-
196
-
197
-
198
-
199
-
200
-
201
-
202
-
203
-
204
-
205
-
206
-
207
-
208
 |
 |