Lenovo ThinkPad E450 (English) Hardware Maintenance Manual - ThinkPad E450, E4 - Page 71
DIMMdoor, 1030Internalstoragedrive
 |
View all Lenovo ThinkPad E450 manuals
Add to My Manuals
Save this manual to your list of manuals |
Page 71 highlights
Note: Ensure that you reattach the connector cover to the Lenovo OneLink connector after finishing the servicing. 1020 DIMM door Removal steps of the DIMM door Loosen the screws 1 , and then remove the base cover 2 3 . 2 3 2 2 1 Step 1 Screw (quantity) M2 × 4 mm, flat-head, nylon-coated (3) Color Black Torque 0.181 Nm (1.85 kgf-cm) 1030 Internal storage drive For access, remove this FRU: • "1020 DIMM door" on page 65 Attention: • Do not drop the drive or apply any physical shock to it. The drive is sensitive to physical shock. Improper handling can cause damage and permanent loss of data. Chapter 9. Removing or replacing a FRU 65
-
 1
1 -
2
-
3
-
4
-
5
-
6
-
7
-
8
-
9
-
10
-
11
-
12
-
13
-
14
-
15
-
16
-
17
-
18
-
19
-
20
-
21
-
22
-
23
-
24
-
25
-
26
-
27
-
28
-
29
-
30
-
31
-
32
-
33
-
34
-
35
-
36
-
37
-
38
-
39
-
40
-
41
-
42
-
43
-
44
-
45
-
46
-
47
-
48
-
49
-
50
-
51
-
52
-
53
-
54
-
55
-
56
-
57
-
58
-
59
-
60
-
61
-
62
-
63
-
64
-
65
-
 66
66 -
 67
67 -
 68
68 -
 69
69 -
 70
70 -
 71
71 -
 72
72 -
 73
73 -
 74
74 -
 75
75 -
 76
76 -
77
-
78
-
79
-
80
-
81
-
82
-
83
-
84
-
85
-
86
-
87
-
88
-
89
-
90
-
91
-
92
-
93
-
94
-
95
-
96
-
97
-
98
-
99
-
100
-
101
-
102
-
103
-
104
 |
 |

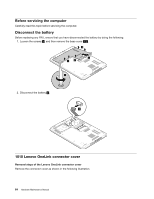
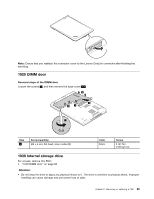
Note:
Ensure that you reattach the connector cover to the Lenovo OneLink connector after finishing the
servicing.
1020DIMMdoor
RemovalstepsoftheDIMMdoor
Loosen the screws
1
, and then remove the base cover
2
3
.
3
1
2
2
2
Step
Screw(quantity)
Color
Torque
1
M2 × 4 mm, flat-head, nylon-coated (3)
Black
0.181 Nm
(1.85 kgf-cm)
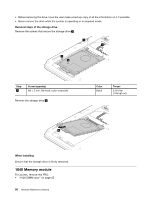
1030Internalstoragedrive
For access, remove this FRU:
• “1020 DIMM door” on page 65
Attention:
• Do not drop the drive or apply any physical shock to it. The drive is sensitive to physical shock. Improper
handling can cause damage and permanent loss of data.
Chapter 9
.
Removing or replacing a FRU
65