Lenovo ThinkPad R60e (English) Service and Troubleshooting Guide - Page 48
installed
 |
View all Lenovo ThinkPad R60e manuals
Add to My Manuals
Save this manual to your list of manuals |
Page 48 highlights
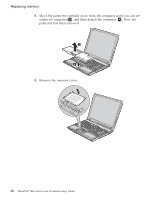
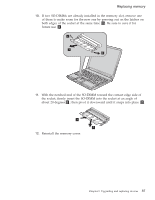
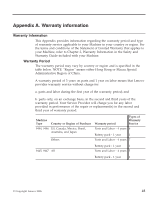
Replacing memory 4. Click Yes. The computer restarts, and the BIOS Setup Utility screen opens. The "Installed memory" item shows the total amount of memory installed in your computer. For example, if your computer has 256 MB of memory and you install a 256-MB SO-DIMM in it, the quantity shown in "Installed memory" should be 512 MB. 40 ThinkPad® R60 Service and Troubleshooting Guide
-
 1
1 -
2
-
3
-
4
-
5
-
6
-
7
-
8
-
9
-
10
-
11
-
12
-
13
-
14
-
15
-
16
-
17
-
18
-
19
-
20
-
21
-
22
-
23
-
24
-
25
-
26
-
27
-
28
-
29
-
30
-
31
-
32
-
33
-
34
-
35
-
36
-
37
-
38
-
39
-
40
-
41
-
42
-
 43
43 -
 44
44 -
 45
45 -
 46
46 -
 47
47 -
 48
48 -
 49
49 -
 50
50 -
 51
51 -
 52
52 -
 53
53 -
54
-
55
-
56
-
57
-
58
-
59
-
60
-
61
-
62
-
63
-
64
-
65
-
66
-
67
-
68
-
69
-
70
-
71
-
72
-
73
-
74
-
75
-
76
-
77
-
78
 |
 |

4.
Click
Yes
.
The
computer
restarts,
and
the
BIOS
Setup
Utility
screen
opens.
The
“Installed
memory”
item
shows
the
total
amount
of
memory
installed
in
your
computer.
For
example,
if
your
computer
has
256
MB
of
memory
and
you
install
a
256-MB
SO-DIMM
in
it,
the
quantity
shown
in
“Installed
memory”
should
be
512
MB.
Replacing
memory
40
ThinkPad
®
R60
Service
and
Troubleshooting
Guide