Lenovo ThinkPad i Series 1400 Hardware Maintenance Manual (August 1999) - Page 154
could be damage. Be careful in pulling out the cables., When replacing the keyboard
 |
View all Lenovo ThinkPad i Series 1400 manuals
Add to My Manuals
Save this manual to your list of manuals |
Page 154 highlights
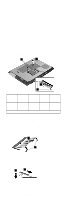
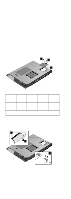
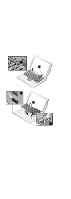
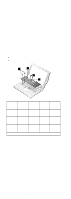
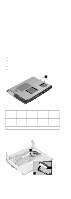
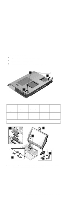
4 5 6 8 7 When replacing the keyboard, make sure that the 3 cables are clean and insert them directly into the connectors, making sure they contact with the bottom of the connector. Now press down on the latch of the connector to secure. Note: If the cables do not touch the bottom of the con- nector, the keyboard function will be rendered useless. Attention: The cables of the keyboard are fragile and could be damage. Be careful in pulling out the cables. 146 ThinkPad i Series 1400 HMM
-
 1
1 -
2
-
3
-
4
-
5
-
6
-
7
-
8
-
9
-
10
-
11
-
12
-
13
-
14
-
15
-
16
-
17
-
18
-
19
-
20
-
21
-
22
-
23
-
24
-
25
-
26
-
27
-
28
-
29
-
30
-
31
-
32
-
33
-
34
-
35
-
36
-
37
-
38
-
39
-
40
-
41
-
42
-
43
-
44
-
45
-
46
-
47
-
48
-
49
-
50
-
51
-
52
-
53
-
54
-
55
-
56
-
57
-
58
-
59
-
60
-
61
-
62
-
63
-
64
-
65
-
66
-
67
-
68
-
69
-
70
-
71
-
72
-
73
-
74
-
75
-
76
-
77
-
78
-
79
-
80
-
81
-
82
-
83
-
84
-
85
-
86
-
87
-
88
-
89
-
90
-
91
-
92
-
93
-
94
-
95
-
96
-
97
-
98
-
99
-
100
-
101
-
102
-
103
-
104
-
105
-
106
-
107
-
108
-
109
-
110
-
111
-
112
-
113
-
114
-
115
-
116
-
117
-
118
-
119
-
120
-
121
-
122
-
123
-
124
-
125
-
126
-
127
-
128
-
129
-
130
-
131
-
132
-
133
-
134
-
135
-
136
-
137
-
138
-
139
-
140
-
141
-
142
-
143
-
144
-
145
-
146
-
147
-
148
-
 149
149 -
 150
150 -
 151
151 -
 152
152 -
 153
153 -
 154
154 -
 155
155 -
 156
156 -
 157
157 -
 158
158 -
 159
159 -
160
-
161
-
162
-
163
-
164
-
165
-
166
-
167
-
168
-
169
-
170
-
171
-
172
-
173
-
174
-
175
-
176
-
177
-
178
-
179
-
180
-
181
-
182
-
183
-
184
-
185
-
186
-
187
-
188
-
189
-
190
-
191
-
192
-
193
-
194
-
195
-
196
-
197
-
198
-
199
-
200
-
201
-
202
-
203
-
204
 |
 |

4
5
6
8
7
When replacing the keyboard, make sure that the 3 cables
are clean and insert them directly into the connectors,
making sure they contact with the bottom of the connector.
Now press down on the latch of the connector to secure.
Note:
If the cables do not touch the bottom of the con-
nector, the keyboard function will be rendered
useless.
Attention:
The cables of the keyboard are fragile and
could be damage. Be careful in pulling out the cables.
146
ThinkPad i Series 1400 HMM