Lexmark C762 Quick Reference Pages - Page 10
Connection guide - windows 2000 printer driver
 |
View all Lexmark C762 manuals
Add to My Manuals
Save this manual to your list of manuals |
Page 10 highlights
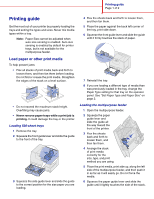
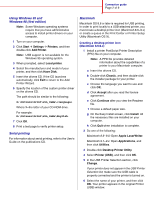
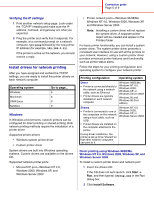
Connection guide Page 1 of 9 Connection guide Follow these steps to properly connect your printer to your computer or network system: 1 Install drivers for local printing on page 1. 2 Verify printer setup on page 3. 3 Configure for TCP/IP on page 4. 4 Install drivers for network printing on page 5. Install drivers for local printing The printer driver is software that lets your computer communicate with your printer. The procedure to install drivers depends on the operating system you are using. Use the following table to find driver installation instructions for your particular operating system. If you need additional help, refer to the documentation that shipped with your computer and your software. Operating system Go to page... Windows Windows Server 2003, Windows 2000, 1 Windows XP, Windows 98/Me, Windows NT 4.x Windows 95 and Windows 98 (first edition) 2 Serial printing 2 Macintosh 2 UNIX/Linux 3 Windows Some Windows operating systems may already include a printer driver that is compatible with your printer. This may mean that installation will seem automatic in later versions of Windows. System printer drivers work well for simple printing, but they contain less functionality than our enhanced custom printer driver. Note: Installing a custom driver will not replace the system driver. A separate printer object will be created and appear in the Printers folder. Use the drivers CD that shipped with your printer to install the custom printer driver and obtain all the enhanced printer features and functionality. Using Windows Server 2003, Windows 2000, Windows XP, and Windows 98 SE, Windows Me, and Windows NT 1 Insert the drivers CD. If the CD does not auto launch, click Start à Run, and then type D:\Setup.exe in the Run dialog box. Note: USB support is not available for Windows NT operating systems. 2 Click Install Software. Note: Some Windows operating systems require that you have administrative access to install printer drivers on your computer. 3 Click Printer and Software. 4 Click Agree to accept the license agreement. 5 Select Suggested, and then click Next. The Suggested option is the default installation for local and network-attached setup. If you need to install utilities, change settings, or customize device drivers, select Custom, and follow the instructions on your screen. 6 Select Local Attached, and then click Finish. 7 Select the port you are using to connect the printer to the computer, and then click Next. 8 Click Done. 9 Print a test page to verify printer setup.
-
 1
1 -
2
-
3
-
4
-
 5
5 -
 6
6 -
 7
7 -
 8
8 -
 9
9 -
 10
10 -
 11
11 -
 12
12 -
 13
13 -
 14
14 -
 15
15 -
16
-
17
-
18
-
19
-
20
-
21
-
22
-
23
-
24
-
25
-
26
-
27
-
28
-
29
-
30
-
31
-
32
-
33
 |
 |