Lexmark C762 User Reference - Page 89
Too Many Disks, Disk Not Supported
 |
View all Lexmark C762 manuals
Add to My Manuals
Save this manual to your list of manuals |
Page 89 highlights
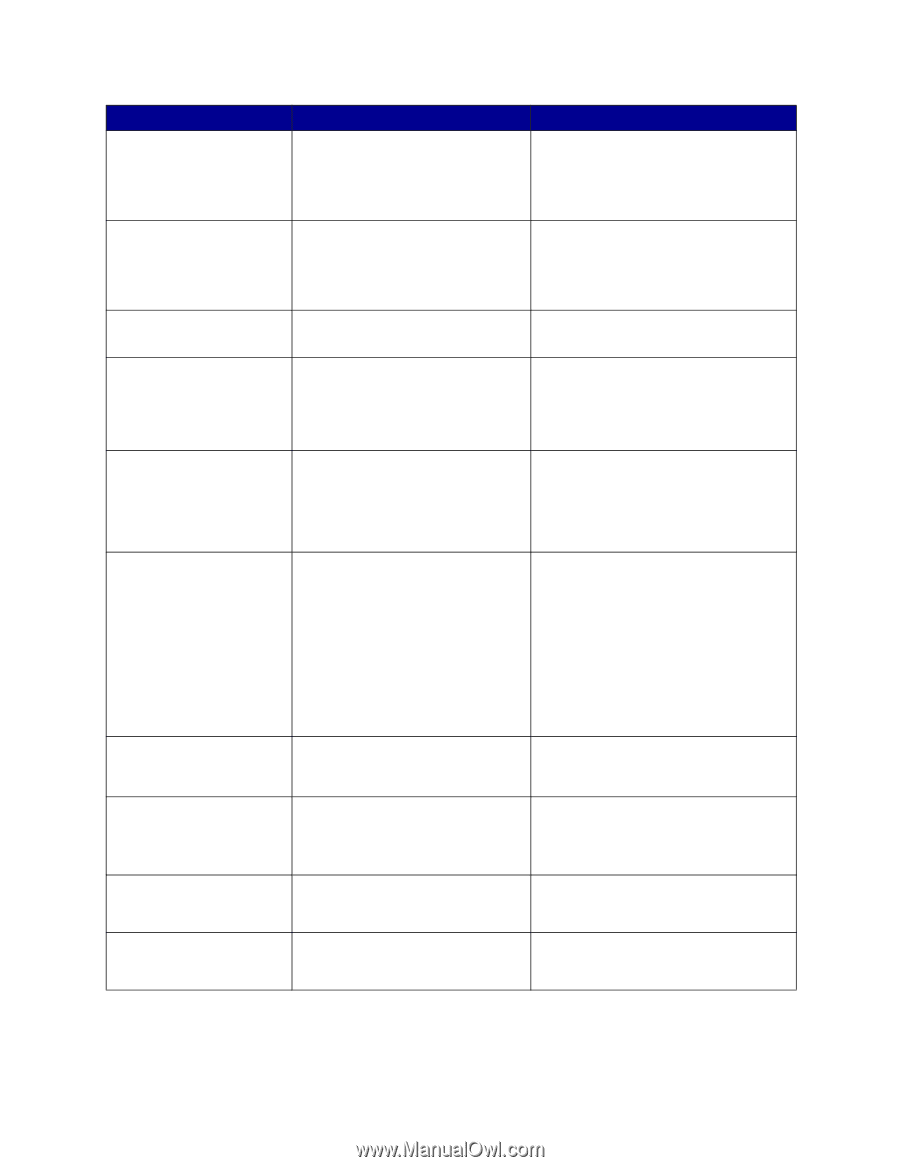
Message 58 Too Many Disks Installed What this message means Too many hard disks are installed on the printer. The printer only supports one hard disk at a time. 58 Too Many Flash Options Too many flash memory options are installed on the printer. 59 Incompatible 61 Defective Disk You have installed an incompatible device. The printer detects a defective hard disk. 62 Disk Full There is not enough memory on the hard disk to store the data sent to the printer. 63 Unformatted Disk The printer detects an unformatted hard disk. 64 Disk Not Supported The printer detects that an incompatible hard disk is installed. 64 Unsupported Disk The printer detects an unsupported Format disk format. 80 Fuser Maintenance The counter that tracks wear on the fuser has reached its limit. 81 Engine Code CRC Microcode in the engine flash code Failure module has failed a system check. What you can do Turn off and unplug the printer. Remove the excess hard disks from the printer. Plug in the printer and turn it on. See also: Removing memory and option cards Turn off and unplug the printer. Remove the excess flash memory. Plug in the printer and turn it on. See also: Removing memory and option cards Remove the device and press Go to clear the message. • Press Go to clear the message and continue printing. • Install a different hard disk before you perform any operations that require one. See also: Setup Guide • Press Go to clear the message and continue processing. Any information not previously stored on the hard disk is deleted. • Delete fonts, macros, and other data stored on the hard disk. • Press Go to clear the message and continue printing. • Format the disk before performing any disk operations. To format the disk, select Format Disk from the Utilities Menu. • If the error message remains, the hard disk may be defective and require replacing. Install a new hard disk and format it. See also: Format Disk Turn the printer off and remove the disk. See also: Removing memory and option cards • Press Go to clear the message. • Format the disk. Note: Disk operations are not allowed until the disk is formatted. • Press Go to continue printing. • If print quality is unacceptable, replace the fuser. • Press Go to clear the message. • Discard the code. Retransmit the microcode data from the host computer. 89
-
 1
1 -
2
-
3
-
4
-
5
-
6
-
7
-
8
-
9
-
10
-
11
-
12
-
13
-
14
-
15
-
16
-
17
-
18
-
19
-
20
-
21
-
22
-
23
-
24
-
25
-
26
-
27
-
28
-
29
-
30
-
31
-
32
-
33
-
34
-
35
-
36
-
37
-
38
-
39
-
40
-
41
-
42
-
43
-
44
-
45
-
46
-
47
-
48
-
49
-
50
-
51
-
52
-
53
-
54
-
55
-
56
-
57
-
58
-
59
-
60
-
61
-
62
-
63
-
64
-
65
-
66
-
67
-
68
-
69
-
70
-
71
-
72
-
73
-
74
-
75
-
76
-
77
-
78
-
79
-
80
-
81
-
82
-
83
-
 84
84 -
 85
85 -
 86
86 -
 87
87 -
 88
88 -
 89
89 -
 90
90 -
 91
91 -
 92
92 -
 93
93 -
 94
94 -
95
-
96
-
97
-
98
-
99
-
100
-
101
-
102
-
103
-
104
-
105
-
106
-
107
-
108
-
109
-
110
-
111
-
112
-
113
-
114
-
115
-
116
-
117
-
118
-
119
-
120
-
121
-
122
-
123
-
124
-
125
-
126
-
127
-
128
-
129
-
130
-
131
-
132
-
133
-
134
-
135
-
136
-
137
-
138
-
139
-
140
-
141
-
142
-
143
 |
 |