Lexmark CX331 Quick Reference - Page 3
Cleaning the scanner
 |
View all Lexmark CX331 manuals
Add to My Manuals
Save this manual to your list of manuals |
Page 3 highlights
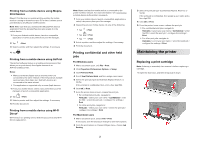
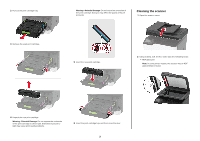
2 Pull out the print cartridge tray. 3 Remove the used print cartridge. Warning-Potential Damage: Do not touch the underside of the print cartridge. Doing so may affect the quality of future print jobs. Cleaning the scanner 1 Open the scanner cover. 5 Insert the new print cartridge. 2 Using a damp, soft, lint-free cloth, wipe the following areas: • ADF glass pad Note: In some printer models, this location has an ADF glass instead of a pad. 4 Unpack the new print cartridge. Warning-Potential Damage: Do not expose the underside of the print cartridge to direct light. Extended exposure to light may cause print quality problems. 6 Insert the print cartridge tray, and then close the door. 3
-
 1
1 -
 2
2 -
 3
3 -
 4
4 -
 5
5 -
 6
6 -
 7
7 -
 8
8 -
 9
9 -
10
-
11
 |
 |

2
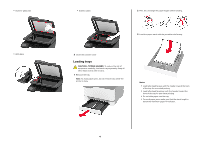
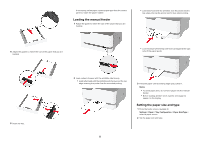
Pull out the print cartridge tray.
3
Remove the used print cartridge.
4
Unpack the new print cartridge.
Warning—Potential Damage:
Do not expose the underside
of the print cartridge to direct light. Extended exposure to
light may cause print quality problems.
Warning—Potential Damage:
Do not touch the underside of
the print cartridge. Doing so may affect the quality of future
print jobs.
5
Insert the new print cartridge.
6
Insert the print cartridge tray, and then close the door.
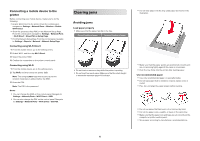
Cleaning the scanner
1
Open the scanner cover.
2
Using a damp, soft, lint-free cloth, wipe the following areas:
•
ADF glass pad
Note:
In some printer models, this location has an ADF
glass instead of a pad.
3