Lexmark CX331 Quick Reference - Page 4
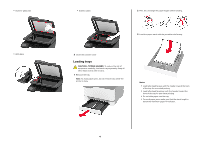
Loading trays
 |
View all Lexmark CX331 manuals
Add to My Manuals
Save this manual to your list of manuals |
Page 4 highlights
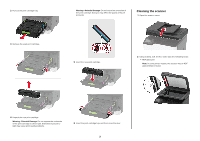
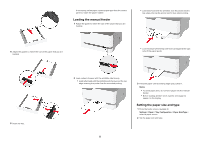
• Scanner glass pad • ADF glass • Scanner glass 2 Flex, fan, and align the paper edges before loading. 3 Load the paper stack with the printable side faceup. 3 Close the scanner cover. Loading trays CAUTION-TIPPING HAZARD: To reduce the risk of equipment instability, load each tray separately. Keep all other trays closed until needed. 1 Remove the tray. Note: To avoid paper jams, do not remove trays while the printer is busy. Notes: • Load letterhead faceup with the header toward the back of the tray for one‑sided printing. • Load letterhead facedown with the header toward the front of the tray for two‑sided printing. • Do not slide paper into the tray. • To avoid paper jams, make sure that the stack height is below the maximum paper fill indicator. 4
-
 1
1 -
 2
2 -
 3
3 -
 4
4 -
 5
5 -
 6
6 -
 7
7 -
 8
8 -
 9
9 -
 10
10 -
11
 |
 |
