Lexmark E250DN Service Manual - Page 105
Controller card removal, Right side cover removal
 |
UPC - 734646062992
View all Lexmark E250DN manuals
Add to My Manuals
Save this manual to your list of manuals |
Page 105 highlights
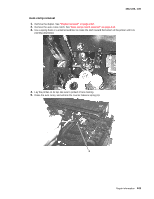
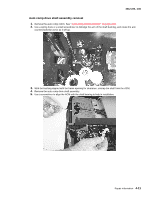
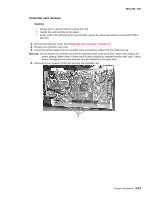
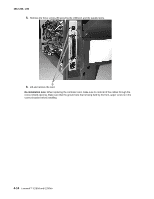
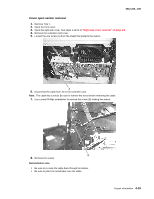
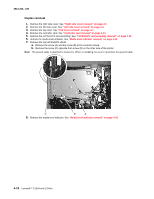
4512-220, -230 Controller card removal Warning: • Always touch a ground before touching the card. • Handle the card carefully by the edges. • Never replace the operator panel and controller card at the same time without a successful POR in between. 1. Remove the right side cover. See"Right side cover removal" on page 4-5. 2. Remove the controller card cover. 3. Disconnect all the cables from the controller card, and remove cables from the shield housing. Warning: Do not replace the controller card and the operator panel at the same time. Each card contains the printer settings. When either of these cards is new, it obtains its settings from the other card. Critical factory settings are lost when both are new and replaced at the same time. 4. Remove the four screws (A) that are securing the controller card. Repair information 4-13
-
 1
1 -
2
-
3
-
4
-
5
-
6
-
7
-
8
-
9
-
10
-
11
-
12
-
13
-
14
-
15
-
16
-
17
-
18
-
19
-
20
-
21
-
22
-
23
-
24
-
25
-
26
-
27
-
28
-
29
-
30
-
31
-
32
-
33
-
34
-
35
-
36
-
37
-
38
-
39
-
40
-
41
-
42
-
43
-
44
-
45
-
46
-
47
-
48
-
49
-
50
-
51
-
52
-
53
-
54
-
55
-
56
-
57
-
58
-
59
-
60
-
61
-
62
-
63
-
64
-
65
-
66
-
67
-
68
-
69
-
70
-
71
-
72
-
73
-
74
-
75
-
76
-
77
-
78
-
79
-
80
-
81
-
82
-
83
-
84
-
85
-
86
-
87
-
88
-
89
-
90
-
91
-
92
-
93
-
94
-
95
-
96
-
97
-
98
-
99
-
 100
100 -
 101
101 -
 102
102 -
 103
103 -
 104
104 -
 105
105 -
 106
106 -
 107
107 -
 108
108 -
 109
109 -
 110
110 -
111
-
112
-
113
-
114
-
115
-
116
-
117
-
118
-
119
-
120
-
121
-
122
-
123
-
124
-
125
-
126
-
127
-
128
-
129
-
130
-
131
-
132
-
133
-
134
-
135
-
136
-
137
-
138
-
139
-
140
-
141
-
142
-
143
-
144
-
145
-
146
-
147
-
148
-
149
-
150
-
151
-
152
-
153
-
154
-
155
-
156
-
157
-
158
-
159
-
160
-
161
-
162
-
163
-
164
 |
 |
