Lexmark E250DN User's Guide - Page 78
Knowing when you need new supplies - maintenance kit
 |
UPC - 734646062992
View all Lexmark E250DN manuals
Add to My Manuals
Save this manual to your list of manuals |
Page 78 highlights
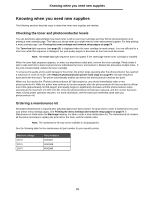
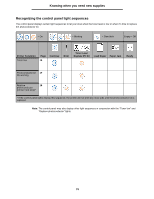
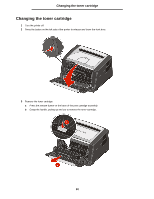
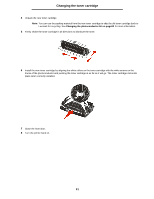
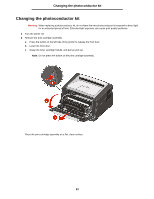
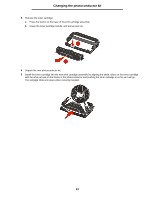
Knowing when you need new supplies Knowing when you need new supplies The following sections describe ways to determine when new supplies are needed. Checking the toner and photoconductor levels You can determine approximately how much toner is left in your toner cartridge and how full the photoconductor is by printing a menu settings page. This helps you decide when you might need to order replacement supplies. For help printing a menu settings page, see Printing the menu settings and network setup pages on page74. The Toner low light sequence (see page16) is displayed when the toner cartridge is nearly empty. You can still print for a short time while this sequence is displayed, but print quality begins to decrease as the toner level decreases. Note: The Toner low light sequence does not appear if the 1500-page starter toner cartridge is installed. When the toner light sequence appears, or when you experience faded print, remove the toner cartridge. Firmly shake it side to side and front to back several times to redistribute the toner, and reinsert it. Repeat this procedure multiple times . If the print remains faded, replace the toner cartridge. To ensure print quality and to avoid damage to the printer, the printer stops operating after the photoconductor has reached a maximum of 110% of its life. (See Replace photoconductor (printer hard stop) on page9for the light sequence associated with this stop.) The printer automatically notifies you before the photoconductor reaches this point. When you first receive the "Replace photoconductor kit" light sequence, you should immediately order a new photoconductor kit. While the printer may continue to function properly after the photoconductor kit has reached its official end-of-life (approximately 30,000 pages), print quality begins to significantly decrease until the photoconductor stops operating at the maximum of 110% of its life. Once the photoconductor kit has been replaced, and the counter has been reset, normal printer operation resumes. For more information, see the instruction sheet that came with your photoconductor kit. Ordering a maintenance kit Scheduled maintenance is required after 120,000 pages have been printed. To know when to order a maintenance kit, print your printer menu settings pages. See Printing the menu settings and network setup pages on page74. If Maintenance is listed under the Warnings heading, it is time to order a new maintenance kit. The maintenance kit contains all the items necessary to replace the pick rollers, the fuser, and the transfer roller. Note: The maintenance kit may not be available in all geographies. See the following table for the maintenance kit part number for your specific printer. Machine voltage 110 V 220 V 100 V Part numbers 40X2847 40X2848 40X2849 78
-
 1
1 -
2
-
3
-
4
-
5
-
6
-
7
-
8
-
9
-
10
-
11
-
12
-
13
-
14
-
15
-
16
-
17
-
18
-
19
-
20
-
21
-
22
-
23
-
24
-
25
-
26
-
27
-
28
-
29
-
30
-
31
-
32
-
33
-
34
-
35
-
36
-
37
-
38
-
39
-
40
-
41
-
42
-
43
-
44
-
45
-
46
-
47
-
48
-
49
-
50
-
51
-
52
-
53
-
54
-
55
-
56
-
57
-
58
-
59
-
60
-
61
-
62
-
63
-
64
-
65
-
66
-
67
-
68
-
69
-
70
-
71
-
72
-
 73
73 -
 74
74 -
 75
75 -
 76
76 -
 77
77 -
 78
78 -
 79
79 -
 80
80 -
 81
81 -
 82
82 -
 83
83 -
84
-
85
-
86
-
87
-
88
-
89
-
90
-
91
-
92
-
93
-
94
-
95
-
96
-
97
-
98
-
99
-
100
-
101
 |
 |