Lexmark E260D User Guide - Page 104
Clearing jams in the manual feeder
 |
UPC - 734646084079
View all Lexmark E260D manuals
Add to My Manuals
Save this manual to your list of manuals |
Page 104 highlights
3 Insert the tray. 4 Press to continue printing. Clearing jams in the manual feeder Paper jammed in the manual feeder can usually be grasped and pulled straight out. If the jam cannot be removed this way, check for jammed paper behind the photoconductor kit and toner cartridge unit. For more information, see "Clearing jams behind the photoconductor kit and toner cartridge" on page 99. Clearing jams 104
-
 1
1 -
2
-
3
-
4
-
5
-
6
-
7
-
8
-
9
-
10
-
11
-
12
-
13
-
14
-
15
-
16
-
17
-
18
-
19
-
20
-
21
-
22
-
23
-
24
-
25
-
26
-
27
-
28
-
29
-
30
-
31
-
32
-
33
-
34
-
35
-
36
-
37
-
38
-
39
-
40
-
41
-
42
-
43
-
44
-
45
-
46
-
47
-
48
-
49
-
50
-
51
-
52
-
53
-
54
-
55
-
56
-
57
-
58
-
59
-
60
-
61
-
62
-
63
-
64
-
65
-
66
-
67
-
68
-
69
-
70
-
71
-
72
-
73
-
74
-
75
-
76
-
77
-
78
-
79
-
80
-
81
-
82
-
83
-
84
-
85
-
86
-
87
-
88
-
89
-
90
-
91
-
92
-
93
-
94
-
95
-
96
-
97
-
98
-
 99
99 -
 100
100 -
 101
101 -
 102
102 -
 103
103 -
 104
104 -
 105
105 -
 106
106 -
 107
107 -
 108
108 -
 109
109 -
110
-
111
-
112
-
113
-
114
-
115
-
116
-
117
-
118
-
119
-
120
-
121
-
122
-
123
-
124
-
125
-
126
-
127
-
128
-
129
-
130
-
131
-
132
-
133
-
134
-
135
-
136
-
137
-
138
-
139
-
140
-
141
-
142
 |
 |

3
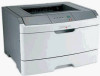
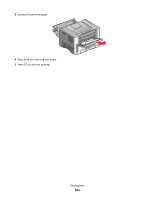
Insert the tray.
4
Press
to continue printing.
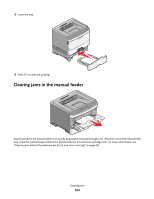
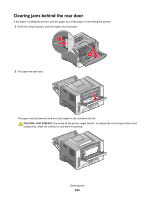
Clearing jams in the manual feeder
Paper jammed in the manual feeder can usually be grasped and pulled straight out. If the jam cannot be removed this
way, check for jammed paper behind the photoconductor kit and toner cartridge unit. For more information, see
“Clearing jams behind the photoconductor kit and toner cartridge” on page 99.
Clearing jams
104