Lexmark E360 Quick Reference - Page 2
Setting the Paper Size and Paper Type on Notes
 |
View all Lexmark E360 manuals
Add to My Manuals
Save this manual to your list of manuals |
Page 2 highlights
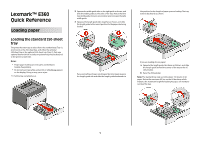
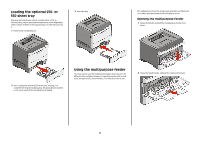
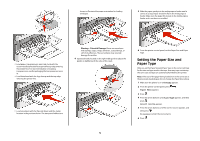
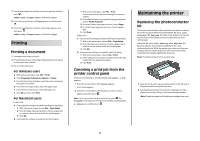
Notes: • Notice the size indicators on the bottom of the tray. Use these indicators to help position the guide. • For setup, load letter- or A4-size paper based on the standard size for your country or region. 4 Flex the sheets back and forth to loosen them, and then fan them. Do not fold or crease the paper. Straighten the edges on a level surface. When loading letterhead, place the top edge of the sheet toward the front of the tray. Load the letterhead with the design placed facedown. 7 Insert the tray. 5 Load the paper stack toward the back of the tray as shown with the recommended print side facedown. Note: Notice the maximum fill line on the side of the width guide which indicates the maximum height for loading paper. Do not try to overload the tray. Do not load A6 paper to the maximum fill line; the tray only holds 150 sheets of A6 paper. 6 Squeeze the width guide tabs on the right guide, and slide the width guides to lightly touch the side of the stack. 8 If a different type of paper was loaded than the type previously loaded in the tray, change the Paper Type setting for the tray from the printer control panel. For more information, see "Setting the Paper Size and Paper Type" on page 5. Note: The difference between the standard 250-sheet tray and the optional 250- and 550-sheet trays is that the standard tray accommodates A6-size paper, so the width guides slide farther to the center of the tray. You also need to adjust the length guide specifically created for A6. 1 Maximum fill line 2
-
 1
1 -
 2
2 -
 3
3 -
 4
4 -
 5
5 -
 6
6 -
 7
7 -
 8
8
 |
 |
