Lexmark E360 Quick Reference - Page 8
Cleaning the exterior of the, printer, Warning-Potential Damage, CAUTION-SHOCK HAZARD - photoconductor
 |
View all Lexmark E360 manuals
Add to My Manuals
Save this manual to your list of manuals |
Page 8 highlights
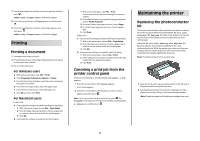
To replace the toner cartridge: 1 Open the front door by pressing the button on the left side of the printer and lowering the door. 2 Press the button on the base of the photoconductor kit, and then pull the toner cartridge out using the handle. 4 Rotate the cartridge in all directions to distribute the toner. 5 Install the new toner cartridge by aligning the rollers on the toner cartridge with the arrows on the tracks of the photoconductor kit. Push the toner cartridge in as far as it will go. The cartridge clicks into place when correctly installed. Cleaning the exterior of the printer 1 Make sure that the printer is turned off and unplugged from the wall outlet. CAUTION-SHOCK HAZARD: To avoid the risk of electric shock when cleaning the exterior of the printer, unplug the power cord from the wall outlet and disconnect all cables to the printer before proceeding. 2 Remove all paper from the printer. 3 Dampen a clean, lint-free cloth with water. Warning-Potential Damage: Do not use household cleaners or detergents, as they may damage the finish of the printer. 4 Wipe only the outside of the printer. Warning-Potential Damage: Using a damp cloth to clean the interior may cause damage to your printer. 5 Make sure all areas of the printer are dry before beginning a new print job. 3 Unpack the new toner cartridge. Warning-Potential Damage: When replacing a toner cartridge, do not leave the new cartridge exposed to direct light for an extended period of time. Extended light exposure can cause print quality problems. 6 Close the front door. 8
-
 1
1 -
2
-
 3
3 -
 4
4 -
 5
5 -
 6
6 -
 7
7 -
 8
8
 |
 |
