Lexmark Genesis S815 Quick Reference Guide - Page 27
Configuring the printer wirelessly using WPS (Windows only), Installing the printer on other - drivers
 |
View all Lexmark Genesis S815 manuals
Add to My Manuals
Save this manual to your list of manuals |
Page 27 highlights
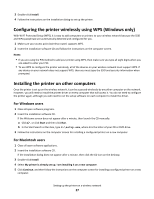
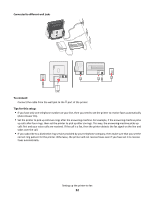
3 Double-click Install. 4 Follow the instructions on the installation dialog to set up the printer. Configuring the printer wirelessly using WPS (Windows only) With Wi-Fi Protected Setup (WPS), it is easy to add computers or printers to your wireless network because the SSID and WPA passphrase are automatically detected and configured for you. 1 Make sure your access point (wireless router) supports WPS. 2 Insert the installation software CD and follow the instructions on the computer screen. Notes: • If you are using the PIN method to add your printer using WPS, then make sure you type all eight digits when you are asked to enter your PIN. • To use WPS to configure the printer wirelessly, all of the devices on your wireless network must support WPS. If any device on your network does not support WPS, then you must type the SSID and security information when prompted. Installing the printer on other computers Once the printer is set up on the wireless network, it can be accessed wirelessly by any other computer on the network. However, you will need to install the printer driver on every computer that will access it. You do not need to configure the printer again, although you will need to run the setup software on each computer to install the driver. For Windows users 1 Close all open software programs. 2 Insert the installation software CD. If the Welcome screen does not appear after a minute, then launch the CD manually: a Click , or click Start and then click Run. b In the Start Search or Run box, type D:\setup.exe, where D is the letter of your CD or DVD drive. 3 Follow the instructions on the computer screen for installing a configured printer on a new computer. For Macintosh users 1 Close all open software applications. 2 Insert the installation software CD. If the installation dialog does not appear after a minute, then click the CD icon on the desktop. 3 Double-click Install. 4 Select My printer is already set up. I am installing it on a new computer. 5 Click Continue, and then follow the instructions on the computer screen for installing a configured printer on a new computer. Setting up the printer on a wireless network 27
-
 1
1 -
2
-
3
-
4
-
5
-
6
-
7
-
8
-
9
-
10
-
11
-
12
-
13
-
14
-
15
-
16
-
17
-
18
-
19
-
20
-
21
-
 22
22 -
 23
23 -
 24
24 -
 25
25 -
 26
26 -
 27
27 -
 28
28 -
 29
29 -
 30
30 -
 31
31 -
 32
32 -
33
-
34
-
35
-
36
-
37
-
38
-
39
-
40
-
41
-
42
-
43
-
44
-
45
-
46
-
47
-
48
-
49
-
50
-
51
-
52
-
53
-
54
-
55
-
56
-
57
-
58
-
59
-
60
-
61
-
62
-
63
-
64
-
65
-
66
-
67
-
68
-
69
-
70
-
71
-
72
-
73
-
74
-
75
-
76
-
77
-
78
-
79
-
80
-
81
-
82
-
83
-
84
-
85
-
86
-
87
-
88
-
89
-
90
-
91
-
92
-
93
-
94
-
95
-
96
-
97
 |
 |