Lexmark MS811 Quick Reference - Page 1
Lexmark MS811 Manual
 |
View all Lexmark MS811 manuals
Add to My Manuals
Save this manual to your list of manuals |
Page 1 highlights
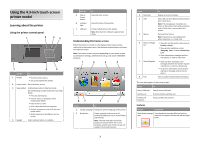
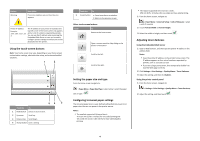
Quick Reference Using the 2.4-inch display printer model Learning about the printer Using the printer control panel 1 2 34 5 6 10 9 87 Use the To 1 Display • View the printer status. • Set up and operate the printer. 2 Select button Submit changes made in the printer settings. 3 Arrow buttons Scroll up and down or left and right. 4 Keypad Enter numbers, letters, or symbols. Use the To 5 Sleep button Enable Sleep mode or Hibernate mode. Do the following to wake the printer from Sleep mode: • Press any hard button. • Pull out Tray 1 or load paper in the multipurpose feeder. • Open a door or cover. • Send a print job from the computer. • Perform a power‑on reset with the main power switch. • Attach a device to the USB port on the printer. 6 Stop or Stop all printer activity. Cancel button 7 Back button Return to the previous screen. 8 Home button Go to the home screen. 9 Indicator light Check the status of the printer. 10 USB port Connect a flash drive to the printer. Note: Only the front USB port supports flash drives. Setting the paper size and type 1 From the printer control panel, navigate to: > Settings > > Paper Menu > > Paper Size/Type > 2 Press the up or down arrow button to select the tray or feeder, and then press . 3 Press the up or down arrow button to select the paper size, and then press . 4 Press the up or down arrow button to select the paper type, and then press to change the settings. Configuring Universal paper settings The Universal paper size is a user‑defined setting that lets you print on paper sizes that are not preset in the printer menus. Notes: • The smallest supported Universal size is 70 x 127 mm (2.76 x 5 inches) for one‑sided printing and 105 x 148 mm (4.13 x 5.83 inches) for two‑sided (duplex) printing. • The largest supported Universal size is 216 x 356 mm (8.5 x 14 inches) for one‑sided and two‑sided printing. From the printer control panel, navigate to: > Settings > > Paper Menu > > Universal Setup > > Units of Measure > > select unit of measure > Adjusting toner darkness Using the Embedded Web Server 1 Open a Web browser, and then type the IP address of the printer in the address field. Notes: • View the printer IP address in the TCP/IP section in the Network/Ports menu. The IP address appears as four sets of numbers separated by periods, such as 123.123.123.123. • If you are using a proxy server, then temporarily disable it to load the Web page correctly. 2 Click Settings > Print Settings > Quality Menu > Toner Darkness. 3 Adjust the toner darkness, and then click Submit. Using the printer control panel 1 From the printer control panel, navigate to: > Settings > > Print Settings > Menu > > Toner Darkness > Quality 2 Adjust the toner darkness, and then press . 1
-
 1
1 -
 2
2 -
 3
3 -
 4
4 -
 5
5 -
 6
6 -
 7
7 -
8
-
9
-
10
-
11
-
12
-
13
-
14
-
15
-
16
-
17
-
18
-
19
-
20
-
21
-
22
-
23
-
24
-
25
-
26
-
27
-
28
-
29
-
30
-
31
 |
 |