Lexmark MarkNet N4050e User's Guide for Windows - Page 17
Installing your printer on the network
 |
View all Lexmark MarkNet N4050e manuals
Add to My Manuals
Save this manual to your list of manuals |
Page 17 highlights
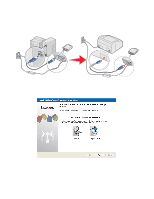
8 If security was selected, enter the appropriate security key(s), and then click Next. If no security was selected, proceed to step 9. 9 Check each network attribute on the summary screen to make sure that the settings are correct. If the settings are correct, click Next to apply these settings to your print server. 10 Disconnect the USB cable from both your computer and the print server. 11 Use the same cable to connect the print server to your printer. To make this connection, insert the large end of the USB cable into the middle USB port on the back of the print server, and then insert the small end of the USB cable into your printer. 12 Click Next to continue with the Setup Utility Wizard. 13 Write down the port or MAC address information displayed on the screen. This information will be needed when installing your printer on the network. 14 Remove the Setup Utility CD from your computer, and insert your printer drivers CD or printer software CD. 15 Click Finish to close the Setup Utility Wizard, and proceed to Installing your printer on the network. Installing your printer on the network Once the print server has been configured, use the printer drivers CD or printer software CD that came with your printer to install your network printer on the computers attached to your network. • Make sure that your printer drivers CD or printer software CD is inserted into the computer you want to install the printer for. • When installing the printer, follow the Network installation path. This process can vary between different printers. Installing your network printer on additional network computers If you are installing your network printer for use with multiple computers on the network, you will need to repeat the Installing your printer on the network process for each computer you want to have access to the printer. The wireless print server does not need to be reconfigured for each successive installation. Installing third-party network printers If you are using the N4050e wireless print server with a third-party printer, you will need to use an alternate setup process to complete the installation of your printer on your network. Third-party printers must first be installed as a local printer, directly attached to your computer, before the wireless print server is configured and connected to the printer. The printer port that the printer uses Configuring your wireless print server 11
-
 1
1 -
2
-
3
-
4
-
5
-
6
-
7
-
8
-
9
-
10
-
11
-
 12
12 -
 13
13 -
 14
14 -
 15
15 -
 16
16 -
 17
17 -
 18
18 -
 19
19 -
 20
20 -
 21
21 -
 22
22 -
23
-
24
-
25
-
26
-
27
-
28
-
29
 |
 |