Lexmark MarkNet N4050e User's Guide for Windows - Page 18
Right-click the printer icon that was created when the printer was installed in step 3., Go to your
 |
View all Lexmark MarkNet N4050e manuals
Add to My Manuals
Save this manual to your list of manuals |
Page 18 highlights
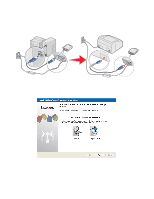
must then be changed to match the port that is created by the N4050e Wireless Print Server Setup Utility. 1 Refer to your printer documentation for instructions on installing your printer as a locally attached printer (not over a network). 2 Connect the printer to your computer using the provided USB cable. 3 Insert your printer software or drivers CD and follow the local installation path. 4 Disconnect the printer from your computer. 5 Connect the print server to your computer and follow the instructions for Configuring your wireless print server, and then proceed to step 6. Note: Be sure to write down the port information that is provided on the final screen of the Setup Utility Wizard. The port name provided will be needed to complete the third-party printer setup process. 6 In your operating system, change the current printer port that was designated during printer installation from step 3 to the port that was provided by the setup utility wizard. For example: To change your printer port a Go to your Printers folder. b Right-click the printer icon that was created when the printer was installed in step 3. c Select Properties. d Select the Ports tab. e Change the selected port to the port provided by the setup utility wizard. f Save or apply the changes. Once the port has been changed, we recommend that you print a test page to verify that the printer is communicating correctly. Make sure that the print server is correctly attached to the printer to ensure that the printer can communicate over the network effectively. Configuring your wireless print server 12
-
 1
1 -
2
-
3
-
4
-
5
-
6
-
7
-
8
-
9
-
10
-
11
-
12
-
 13
13 -
 14
14 -
 15
15 -
 16
16 -
 17
17 -
 18
18 -
 19
19 -
 20
20 -
 21
21 -
 22
22 -
 23
23 -
24
-
25
-
26
-
27
-
28
-
29
 |
 |