Lexmark T430 Service Manual - Page 90
Solving print quality problems
 |
View all Lexmark T430 manuals
Add to My Manuals
Save this manual to your list of manuals |
Page 90 highlights
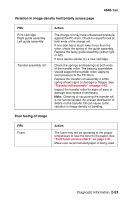
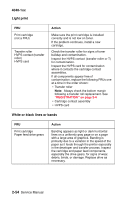
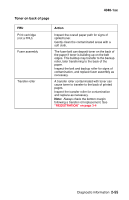
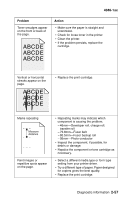
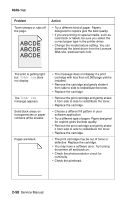
4048-1xx Solving print quality problems To print the Print Quality Pages: 1. Enter Diagnostic Mode: a. Turn the printer off. b. Press and hold the Go and Return buttons. c. Turn the printer on. d. Release the buttons when Performing Self Test displays on the operator panel. 2. Select PRINT TESTS from Diagnostics mode. 3. Select Prt Quality Pgs. Four pages print. Additional button presses are ignored until the pages have printed. If duplex is selected, the pages print front and back.The first page is a mix of graphics and text. The second two pages are graphics, and the last page is blank. The Print Quality Pages can also be printed from the Configuration Menu. See "Prt Quality Pgs" on page 3-23. Problem Light or blurred characters. Action • The print cartridge may be getting low on toner. To use the remaining toner, remove the cartridge and shake the cartridge back and forth. Reinstall the cartridge and press Go. • Change the Toner Darkness setting to a value greater than 8. • Make sure you are using recommended print media. Refer to the Card Stock & Label Guide available on the Lexmark Web site at www.lexmark.com. • If the customer is printing on transparencies, card stock, or labels, be sure to check the Paper Type in the printer driver or operator panel. If the media has an uneven surface, adjust the driver or printer Paper Weight and Paper Texture. • The print cartridge may be defective. Replace it. 2-56 Service Manual
-
 1
1 -
2
-
3
-
4
-
5
-
6
-
7
-
8
-
9
-
10
-
11
-
12
-
13
-
14
-
15
-
16
-
17
-
18
-
19
-
20
-
21
-
22
-
23
-
24
-
25
-
26
-
27
-
28
-
29
-
30
-
31
-
32
-
33
-
34
-
35
-
36
-
37
-
38
-
39
-
40
-
41
-
42
-
43
-
44
-
45
-
46
-
47
-
48
-
49
-
50
-
51
-
52
-
53
-
54
-
55
-
56
-
57
-
58
-
59
-
60
-
61
-
62
-
63
-
64
-
65
-
66
-
67
-
68
-
69
-
70
-
71
-
72
-
73
-
74
-
75
-
76
-
77
-
78
-
79
-
80
-
81
-
82
-
83
-
84
-
 85
85 -
 86
86 -
 87
87 -
 88
88 -
 89
89 -
 90
90 -
 91
91 -
 92
92 -
 93
93 -
 94
94 -
 95
95 -
96
-
97
-
98
-
99
-
100
-
101
-
102
-
103
-
104
-
105
-
106
-
107
-
108
-
109
-
110
-
111
-
112
-
113
-
114
-
115
-
116
-
117
-
118
-
119
-
120
-
121
-
122
-
123
-
124
-
125
-
126
-
127
-
128
-
129
-
130
-
131
-
132
-
133
-
134
-
135
-
136
-
137
-
138
-
139
-
140
-
141
-
142
-
143
-
144
-
145
-
146
-
147
-
148
-
149
-
150
-
151
-
152
-
153
-
154
-
155
-
156
-
157
-
158
-
159
-
160
-
161
-
162
-
163
-
164
-
165
-
166
-
167
-
168
-
169
-
170
-
171
-
172
-
173
-
174
-
175
-
176
-
177
-
178
-
179
-
180
-
181
-
182
-
183
-
184
-
185
-
186
-
187
-
188
-
189
-
190
-
191
-
192
-
193
-
194
-
195
-
196
-
197
-
198
-
199
-
200
-
201
-
202
-
203
-
204
-
205
-
206
-
207
-
208
-
209
-
210
-
211
-
212
-
213
-
214
-
215
-
216
-
217
-
218
-
219
-
220
-
221
-
222
-
223
-
224
-
225
-
226
-
227
-
228
-
229
-
230
-
231
-
232
-
233
-
234
-
235
-
236
-
237
-
238
-
239
-
240
-
241
-
242
-
243
-
244
-
245
-
246
-
247
-
248
-
249
 |
 |
