Lexmark X852E Setup Guide - Page 47
Solve setup problems, Getting more help
 |
UPC - 734646002806
View all Lexmark X852E manuals
Add to My Manuals
Save this manual to your list of manuals |
Page 47 highlights
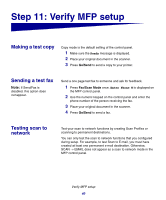
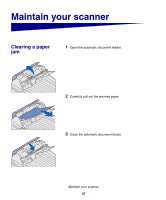
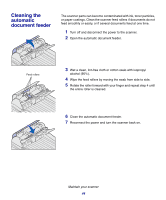
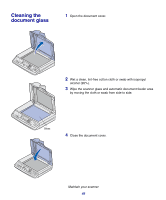
Solve setup problems Problem Ready message not displayed Control panel buttons not responding Scanner is not working Test document did not print Unable to send or receive faxes Network scanning modes (SCAN → PROFILE, SCAN → EMAIL, or SCAN → FTP) do not appear in the control panel Solution The control panel and the printer are not talking to each other, or the printer or scanner may be turned off. 1 Turn the printer off, and then back on. 2 Turn the printer and scanner off. Make sure all cables and cords are connected, and then power up in the correct order. Note: Remember to turn the scanner on before turning on the printer. Make sure the printer is turned on. Note: Remember to turn the scanner on before turning on the printer. 1 Make sure the scanner is unlocked. See step 5 on page 23. 2 Turn printer and scanner off. Make sure all cables and cords are connected, and then power up in the correct order. Note: Remember to turn the scanner on before turning on the printer. 1 Verify that each electrical outlet has power. 2 Make sure all cables and line cords are properly seated. 3 Restart the copy job. 1 Make sure the telephone fax line cable is properly connected to the fax modem port on the print server and to the fax phone outlet. 2 Repeat the fax setup. See "Set send and receive fax information" on page 32. 3 Refer to the online information on the MFP CD. Click View Documentation Use MFP Solving fax problems. Scan to network modes must be configured in order to show up in the MFP control panel. See "Set up network scanning" on page 37 for detailed instructions. Getting more help Launch the MFP CD, and then click Contact Lexmark for a complete list of phone numbers and Web sites. Solve setup problems 42
-
 1
1 -
2
-
3
-
4
-
5
-
6
-
7
-
8
-
9
-
10
-
11
-
12
-
13
-
14
-
15
-
16
-
17
-
18
-
19
-
20
-
21
-
22
-
23
-
24
-
25
-
26
-
27
-
28
-
29
-
30
-
31
-
32
-
33
-
34
-
35
-
36
-
37
-
38
-
39
-
40
-
41
-
 42
42 -
 43
43 -
 44
44 -
 45
45 -
 46
46 -
 47
47 -
 48
48 -
 49
49 -
 50
50 -
 51
51 -
 52
52 -
53
-
54
-
55
-
56
-
57
 |
 |