Lexmark XC9465 Quick Reference - Page 5
Setting up the printer to fax
 |
View all Lexmark XC9465 manuals
Add to My Manuals
Save this manual to your list of manuals |
Page 5 highlights
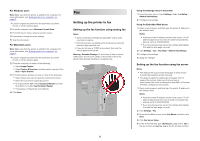
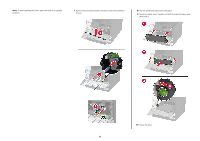
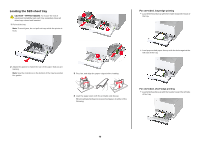
For Windows users Note: Make sure that the printer is added to the computer. For more information, see "Adding printers to a computer" on page 17. 1 Load an original document into the automatic document feeder or on the scanner glass. 2 From the computer, open Windows Fax and Scan. 3 From the Source menu, select a scanner source. 4 If necessary, change the scan settings. 5 Scan the document. For Macintosh users Note: Make sure that the printer is added to the computer. For more information, see "Adding printers to a computer" on page 17. 1 Load an original document into the automatic document feeder or on the scanner glass. 2 From the computer, do either of the following: • Open Image Capture. • Open Printers & Scanners, and then select a printer. Click Scan > Open Scanner. 3 From the Scanner window, do one or more of the following: • Select where you want to save the scanned document. • Select the size of the original document. • To scan from the ADF, select Document Feeder from the Scan Menu or enable Use Document Feeder. • If necessary, configure the scan settings. 4 Click Scan. Fax Setting up the printer to fax Setting up the fax function using analog fax Notes: • Some connection methods are applicable only in some countries or regions. • If the fax function is enabled and not fully set up, then the indicator light may blink red. • If you do not have a TCP/IP environment, then use the control panel to set up fax. Warning-Potential Damage: To avoid loss of data or printer malfunction, do not touch cables or the printer in the area shown while actively sending or receiving a fax. 5 Using the Settings menu in the printer 1 From the home screen, touch Settings > Fax > Fax Setup > General Fax Settings. 2 Configure the settings. Using the Embedded Web Server 1 Open a web browser, and then type the printer IP address in the address field. Notes: • View the printer IP address on the home screen. The IP address appears as four sets of numbers separated by periods, such as 123.123.123.123. • If you are using a proxy server, then temporarily disable it to load the web page correctly. 2 Click Settings > Fax > Fax Setup > General Fax Settings. 3 Configure the settings. 4 Apply the changes. Setting up the fax function using fax server Notes: • This feature lets you send fax messages to a fax service provider that supports e‑mail receiving. • This feature supports outgoing fax messages only. To support fax receive, make sure that you have a device‑based fax, such as analog fax, etherFAX, or Fax over IP (FoIP), configured in your printer. 1 Open a web browser, and then type the printer IP address in the address field. Notes: • View the printer IP address on the home screen. The IP address appears as four sets of numbers separated by periods, such as 123.123.123.123. • If you are using a proxy server, then temporarily disable it to load the web page correctly. 2 Click Settings > Fax. 3 From the Fax Mode menu, select Fax Server, and then click Save. 4 Click Fax Server Setup. 5 In the To Format field, type [#]@myfax.com, where [#] is the fax number and myfax.com is the fax provider domain.
-
 1
1 -
 2
2 -
 3
3 -
 4
4 -
 5
5 -
 6
6 -
 7
7 -
 8
8 -
 9
9 -
 10
10 -
 11
11 -
12
-
13
-
14
-
15
-
16
-
17
-
18
-
19
-
20
-
21
-
22
-
23
-
24
-
25
-
26
-
27
-
28
-
29
-
30
-
31
-
32
-
33
-
34
-
35
 |
 |
