LiftMaster CAPAC Installation Manual - English French Spanish - Page 9
Network, Step 1
 |
View all LiftMaster CAPAC manuals
Add to My Manuals
Save this manual to your list of manuals |
Page 9 highlights
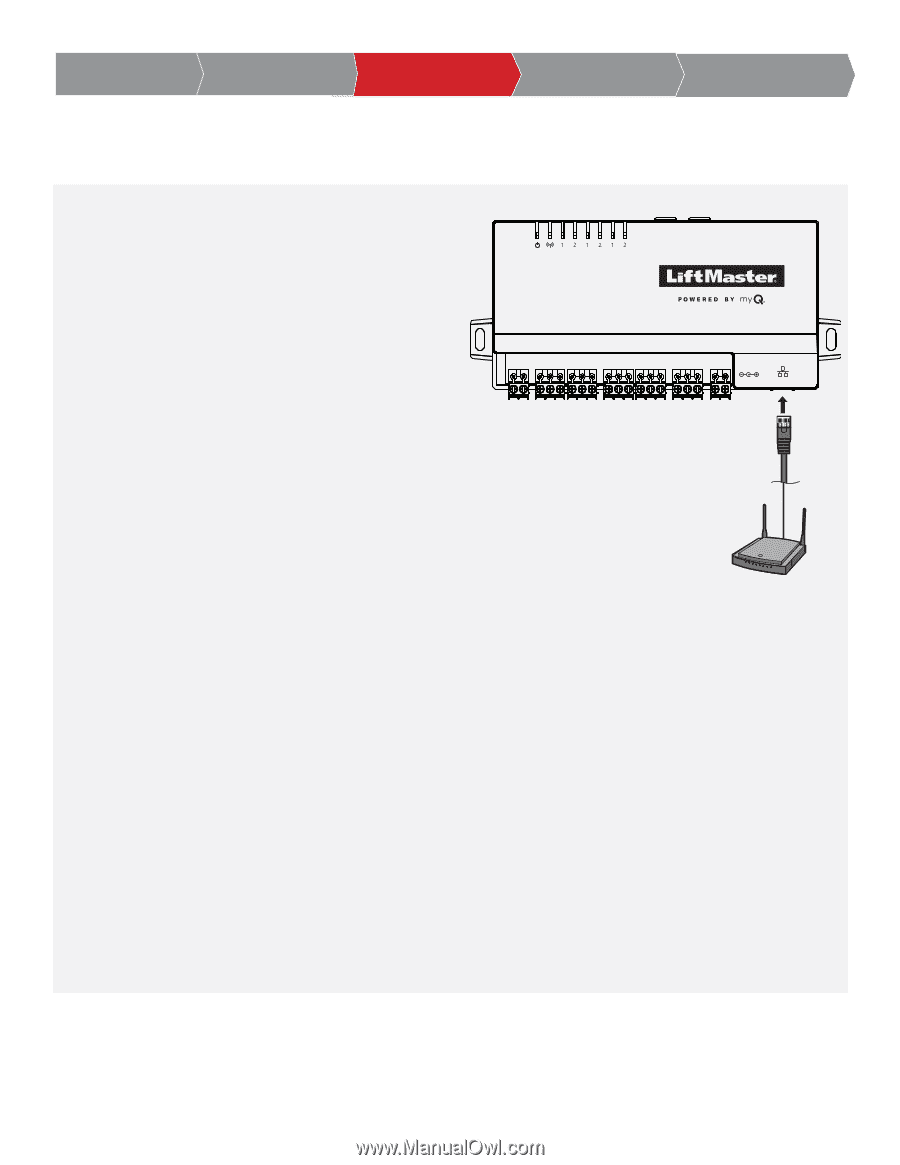
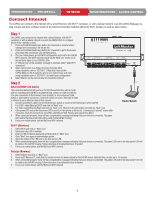
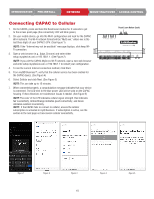
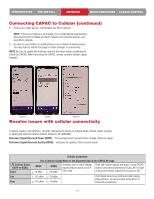
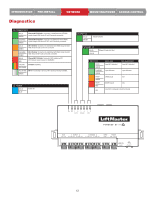
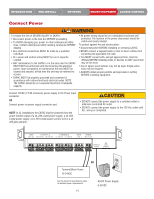
INTRODUCTION PRE-INSTALL NETWORK MOUNTING/POWER ACCESS CONTROL Connect Internet The CAPAC can connect to the Internet with a wired Ethernet, with Wi-Fi® (wireless), or with a cellular network. Log into CAPAC Webpage via step 1 below and then configure which of the internet connection methods (Ethernet, Wi-Fi, Cellular) is used via step 2 below. Step 1 The CAPAC can connect to the Internet with a wired Ethernet, with Wi-Fi® (wireless) or with a cellular network. Log into the CAPAC Wi-Fi to configure which of the methods is used. 1. Press and hold the Reset/Learn button for 5 seconds to reset to factory settings (the connectivity LED will be off). 2. Press and hold the Reset/Learn button for 2 seconds to get to the access point page (the connectivity LED will blink green). 3. On your mobile device, go into Wi-Fi configuration and look for the CAPAC Wi-Fi network. The Wi-Fi network format will be "MyQ-xxx" where xxx is the last three digits of your CAPAC's CP#. 4. If "Internet may not be available" message is received, select "keep Wi-Fi connection". 5. Open web browser (e.g., Edge, Chrome) and enter either setup.myqdevice.com or 192.168.1.1. Note that if you exit the CAPAC MyQ-xxx Wi-Fi network, open a new web browser and enter setup.myqdevice.com or 192.168.1.1 to restart your configuration. 6. Select Start to see the current Internet connection method. OUTPUT WIEGAND INPUT GATE 1 OUTPUT 2 SDA SCL NO COM NC NO COM NC 1 WIEGAND 2 D1 COM D0 D1 COM D0 INPUT POWER 1 GND 2 GND 12V-24V POWER ETHERNET Step 2 Ethernet (DHCP and Static) The Local Area Network(LAN) port is a 10/100 Ethernet interface with an RJ45 jack for connecting the CAPAC to an Ethernet hub, switch, or router in order for it to gain connectivity to the Internet. Use a straight (i.e. non-crossover) Cat5, Cat5e, or Cat6 cable to connect to a local hub, switch or router. This type of cable is referred to as an Ethernet cable in this manual. 1. Connect an Ethernet cable from the Ethernet hub, switch or router to the Ethernet port of the CAPAC. 2. For DHCP, select Ethernet DHCP and click on "Next" icon. 3. For Static, select Ethernet Static and click on "Next" icon. Then fill in the information and click on "Next" icon. 4. If the green LED next to the blue power LED is not lit or if the phone is still on the "connecting to Internet" screen after 3 minutes, check the connections on CAPAC and Ethernet hub. Resolve and repeat from Step 1. 5. When connected properly, there will be a congratulation message indicating that your device is connected. The green LED next to the blue power LED will be solid on the CAPAC housing. 6. From your mobile device, exit the MyQ-xxx Wi-Fi network. Router/Switch Wi-Fi® (Wireless) 1. Select Wi-Fi and click on "Next" icon. 2. Select your site's Wi-Fi network. 3. Enter you Wi-Fi network password and then click on "Next" icon. 4. Click "Next" icon again to acknowledge update. 5. Select the status of the LED next to the blue power LED. 6. When connected properly, there will be a congratulation message indicating that your device is connected. The green LED next to the blue power LED will be solid on the CAPAC housing. Follow directions to troubleshoot issue if needed. 7. From your mobile device, exit the MyQ-xxx Wi-Fi network. Cellular (Wireless) 1. Select Cellular and click on "Next" icon. 2. From myQ® Business™, verify that the cellular service has been enabled for the CAPAC device. Note that this can take up to 15 minutes. 3. When connected properly, there will be a congratulation message indicating that your device is connected. The green LED next to the blue power LED will be solid on the CAPAC housing. Follow directions to troubleshoot issue if needed. 4. From your mobile device, exit the MyQ-xxx Wi-Fi network. 9
-
 1
1 -
2
-
3
-
 4
4 -
 5
5 -
 6
6 -
 7
7 -
 8
8 -
 9
9 -
 10
10 -
 11
11 -
 12
12 -
 13
13 -
 14
14 -
15
-
16
-
17
-
18
-
19
-
20
-
21
-
22
-
23
-
24
-
25
-
26
-
27
-
28
-
29
-
30
-
31
-
32
-
33
-
34
-
35
-
36
-
37
-
38
-
39
-
40
-
41
-
42
-
43
-
44
-
45
-
46
-
47
-
48
-
49
-
50
-
51
-
52
-
53
-
54
-
55
-
56
-
57
-
58
-
59
-
60
 |
 |