LiftMaster EL2000 EL25-KEYPAD PROGRAMMING Manual - Page 33
Add / Modify Resident DnD and/or Call Forwarding, Activate or Deactivate a Directory Code
 |
View all LiftMaster EL2000 manuals
Add to My Manuals
Save this manual to your list of manuals |
Page 33 highlights
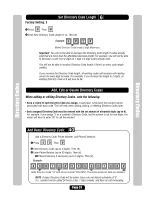
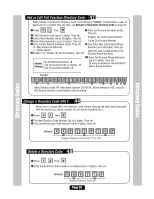
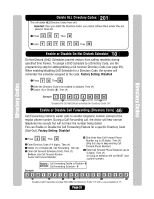
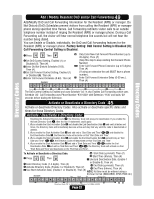
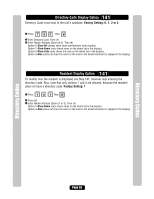
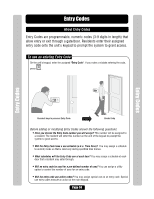
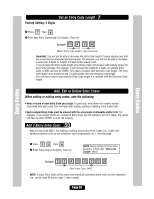
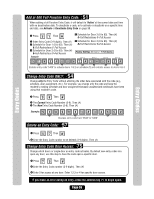
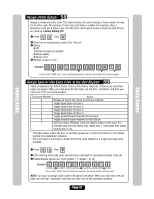
Add / Modify Resident DnD and/or Call Forwarding 49 Add/Modify DnD and Call Forwarding Information for the Resident (NPB) or manager. Do Not Disturb (DnD) Schedules prevent visitors from calling the Resident (NPB) or manager phone during specified time frames. Call Forwarding redirects visitor calls to an outside telephone number instead of ringing the Resident (NPB) or manager phone. During a Call Forwarding call, the visitor will hear normal telephone line sounds but will not hear the number being dialed. You can Enable or Disable, individually, the DnD and Call Forwarding features for the Resident (NPB) or manager phone. Factory Setting: DnD Control Setting is Disabled (0); Call Forwarding Control Setting is Disabled. 1 Press Then 2 Set DnD Control Setting, Enabled (1) or Disabled (0). Then (#). 3 Enter Do Not Disturb Schedule (0-63). Then (#). 4 Set Call Forward Control Setting, Enabled (1) or Disabled (0). Then (#) 5 Enter Call Forward Schedule (0-63). Then (#) Example: 6 Only Enter New Call Forward Phone Number (up to 20 digits). Then (#) (Skip this step to keep existing Call Forward Phone Number) 6A Enter Call Forward Phone Extension (up to 5 digits). Then (#) (If using an extension the unit MUST have a phone number). 7 Enter Call Forward Extension Delay (0-30 sec.). Then (#) Directory Codes Directory Codes 1 2 3 4 5 6 6A 7 The DnD Control Setting is Enabled and uses Schedule "34". It also Enables Call Forwarding which uses Schedule "22". Call Forwarding uses Phone Number "976-5000" with Extension "1136" and waits "20" seconds before dialing the Extension. Activate or Deactivate a Directory Code 45 Activate or deactivate Directory Codes. Also activate or deactivate specific dates and times for those Directory Codes. Activate / Deactivate a Directory Code: Disabling the Activate Directory Code 3 , the Directory Code will always be deactivated. If you enable the Activate Directory Code 3 , then the four If statements could apply: 1. If you disable the Start Activation Date 4 and disable the End Deactivation Date 5 and omit all dates and times, the Directory Code will immediately become active and stay that way until the code is deactivated or deleted. 2. If you enable the Start Activation Date 4 and add only a "Start Date and Time" 4A 4B and disable the End Deactivation Date 5 , the Directory Code will activate on that "Start Date and Time". 3. If you disable the Start Activation Date 4 and enable the End Deactivation Date 5 and add only an "End Date and Time" 5A 5B , the Directory Code will deactivate on that "End Date and Time". 4. If you enable the Start Activation Date 4 and add a "Start Date and Time" 4A 4B enable the End Deactivation Date 5 and add an "End Date and Time" 5A 5B , the Directory Code will activate on that "Start Date and Time" and deactivate on the "End Date and Time". To Activate or Deactivate a Directory Code: 4A Start Date (yymmdd). Then (#) 1 Press Then 4B Start Time (hhmm). Then (#) 5 Use End Deactivation Date, (Enable-1 or Disable-0). Then (#) 2 3 4 Enter Directory Code (1-4 digits). Then (#) Activate Directory Code, (Enable-1 or Disable-0). Then (#) Use Start Activation Date, (Enable-1 or Disable-0). Then (#) 5A End Date (yymmdd). Then (#) 5B End Time (hhmm). Then (#) NOTE: All time must be entered using a Example: 24-hour format (8AM=0800, 3PM=1500 etc.) Year Month Day 24-Hour Time 1 2 3 4 4A 4B 5 5A 5B Directory Code "33" is Activated on February 1st, 2004 at 6PM. Page 32
-
 1
1 -
2
-
3
-
4
-
5
-
6
-
7
-
8
-
9
-
10
-
11
-
12
-
13
-
14
-
15
-
16
-
17
-
18
-
19
-
20
-
21
-
22
-
23
-
24
-
25
-
26
-
27
-
 28
28 -
 29
29 -
 30
30 -
 31
31 -
 32
32 -
 33
33 -
 34
34 -
 35
35 -
 36
36 -
 37
37 -
 38
38 -
39
-
40
-
41
-
42
-
43
-
44
-
45
-
46
-
47
-
48
-
49
-
50
-
51
-
52
-
53
-
54
-
55
-
56
-
57
-
58
-
59
-
60
-
61
-
62
-
63
-
64
-
65
-
66
-
67
-
68
-
69
-
70
-
71
-
72
-
73
-
74
-
75
-
76
-
77
-
78
-
79
-
80
 |
 |