LiftMaster EL2000 EL25-KEYPAD PROGRAMMING Manual - Page 5
Quick Reference Guide for Keypad Programming the Units - error
 |
View all LiftMaster EL2000 manuals
Add to My Manuals
Save this manual to your list of manuals |
Page 5 highlights
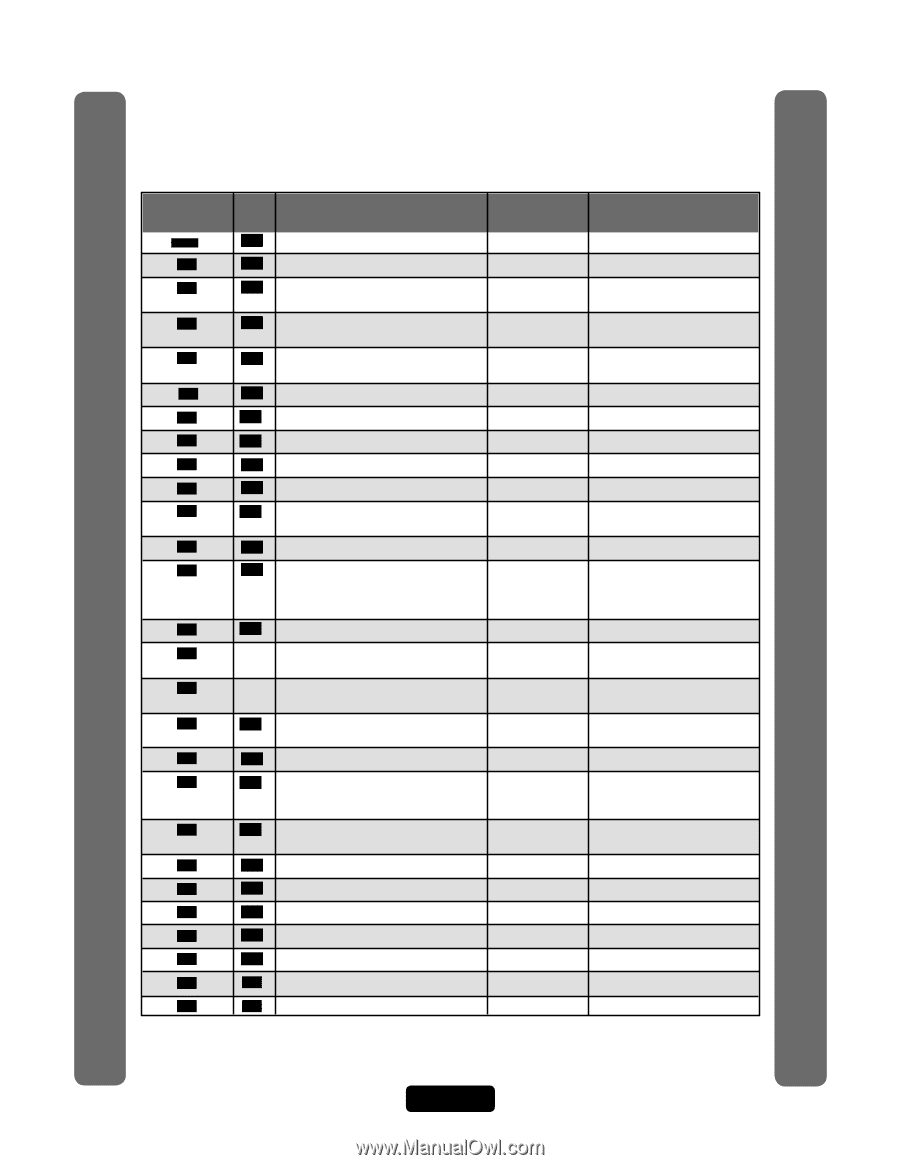
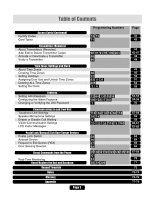
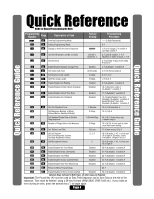
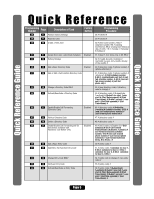
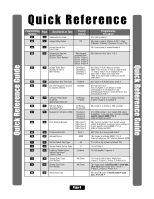
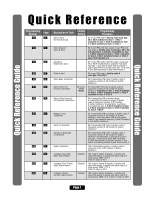
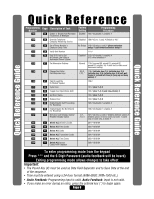
Quick Reference Guide for Keypad Programming the Units Quick Reference Guide Quick Reference Guide Programming Number Page Description of Task Factory Setting Programming Procedure *** 0 15 Entering Programming Mode 15 Exiting Programming Mode *** (6 Digit Password) 0 # 1 56 Change or Verify the Unit's Password 000000 1 # (1 to change; 2 to verify) # (six-digit coded) # 2 20 Set Unit ID Number and No. in Chain Unit ID 1, 2 # (unit ID number, 1-7) # Chain No. 1 (Number of Units in Chain, 1-7) # 3 52 Set the Clock 3 # yymmdd # (day of the week) # hhmm # 4 52 Enable/Disable Daylight Savings Time Enabled 4 # (0=disable; 1=enable) # 5 61 Set Visitor Talk Time 60 Seconds 5 # (15-250 seconds) # 6 29 Set Directory Code Length 3 Digits 6 # (1-4 ) # 7 35 Set Entry Code Length 4 Digits 7 # (3-9) # 9 59 Enable/Disable Call Waiting Enabled 9 # (0=disable; 1=enable) # 10 31 Enable/Disable Do Not Disturb Schedule Disabled 10 # (directory code) # (0=disable; 1=enable) # 11 51 Enable/Disable Unlock Time Zone Enabled 11 # (0=disable; 1=enable) # 12 53 Enable/Disable Anti-Passback Disabled 12 # Enable/Disable True AntiPassback (0=disable; 1=enable) # Enable/Disable Timed AntiPassback (0=disable; 1=enable) # 13 53 Set Anti-Passback Time 3 Minutes 13 # (1-60 minutes) # 14 Set Maximum Number of Rings 5 Rings 14 # (1-9) # Allowed Before Aborting Attempt 15 Set Standard Single Ring or Double 1=Double Ring 15 # (0-1; 0=one long ring, Ring Response 1=double ring) # 16 58 Number of Rings Before Unit Answers 5 Rings 16 # (0-15) # Each unit in chain must have same setting 17 55 Set "Strikes" and "Out" 3 Errors 17 # (max errors, 0-5) # 18 59 Set Call Volume Set Voice Response Volume Set Beep Response Volume 5, 2, 2 18 # (0=mute; 1-10, 1 is low and 10 is high) # (0=mute; 1=low; 2=medium; 3=high) # (0-3) # 19 59 Set Microphone Volume 5 19 # (0=mute, 1-10, 1 is low and 10 is high) # 20 58 Enable/Disable the Telco Mode Enabled 20 # (0=disable; 1=enable) # 21 67 Enable/Disable Direct Commands Enabled 21 # (0=disable, 1=enable) # 22 60 Enable/Disable Voice Mail Disabled 22 # (0=disable, 1=enable) # 23 60 Enable/Disable Access Granted Beeps Enabled 23 # (0=disable, 1=enable) # 24 70 Enable/Disable Real-Time Monitoring Disabled 24 # (0=disable, 1=enable) # 25 61 Return to Menu Programming 25 # 26 61 Enable/Disable All Door Access Granted Disabled 26 # (0=disable, 1=enable) # Optional Steps Indicated in BOLD type, all other steps are Required Important: The Pound Key (#) must be used as Data Field Separator and to Save Data at the end of the sequence. Time must be entered using a 24-hour format (8AM=0800, 3PM=1500 etc.). If you make an error during an entry, press the asterisk key (*) to begin again. Page 4
-
 1
1 -
 2
2 -
 3
3 -
 4
4 -
 5
5 -
 6
6 -
 7
7 -
 8
8 -
 9
9 -
 10
10 -
 11
11 -
12
-
13
-
14
-
15
-
16
-
17
-
18
-
19
-
20
-
21
-
22
-
23
-
24
-
25
-
26
-
27
-
28
-
29
-
30
-
31
-
32
-
33
-
34
-
35
-
36
-
37
-
38
-
39
-
40
-
41
-
42
-
43
-
44
-
45
-
46
-
47
-
48
-
49
-
50
-
51
-
52
-
53
-
54
-
55
-
56
-
57
-
58
-
59
-
60
-
61
-
62
-
63
-
64
-
65
-
66
-
67
-
68
-
69
-
70
-
71
-
72
-
73
-
74
-
75
-
76
-
77
-
78
-
79
-
80
 |
 |