LiftMaster GH GT- Logic 4 Installation Manual - Page 8
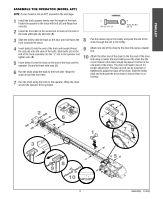
Install The Chain Models T And Gt
 |
View all LiftMaster GH manuals
Add to My Manuals
Save this manual to your list of manuals |
Page 8 highlights
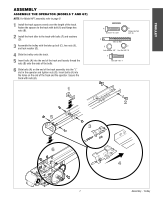
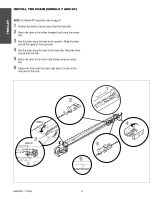
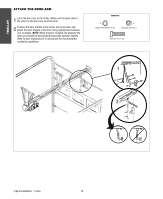
TROLLEY INSTALL THE CHAIN (MODELS T AND GT) NOTE: For Model APT assembly refer to page 9. 1 Position the trolley 2 inches away from the front idler. 2 Attach the chain to the trolley threaded shaft using the master link. 3 Run the chain along the track to the operator. Wrap the chain around the operator drive sprocket. 4 Run the chain along the track to the front idler. Wrap the chain around the front idler. 5 Attach the chain to the front of the trolley using the master link. 6 Tighten the chain until the chain sags about 3 inches at the mid point of the track. 2 1 2˝ MODEL T 3 MODEL GT 4 5 6 3˝ Assembly - Trolley 8
-
 1
1 -
2
-
 3
3 -
 4
4 -
 5
5 -
 6
6 -
 7
7 -
 8
8 -
 9
9 -
 10
10 -
 11
11 -
 12
12 -
 13
13 -
14
-
15
-
16
-
17
-
18
-
19
-
20
-
21
-
22
-
23
-
24
-
25
-
26
-
27
-
28
-
29
-
30
-
31
-
32
-
33
-
34
-
35
-
36
-
37
-
38
-
39
-
40
-
41
-
42
-
43
-
44
 |
 |

TROLLEY
8
Assembly - Trolley
INSTALL THE CHAIN (MODELS T AND GT)
3˝
2˝
1
2
4
5
6
3
NOTE:
For Model APT assembly refer to page 9.
1
Position the trolley 2 inches away from the front idler.
2
Attach the chain to the trolley threaded shaft using the master
link.
3
Run the chain along the track to the operator. Wrap the chain
around the operator drive sprocket.
4
Run the chain along the track to the front idler. Wrap the chain
around the front idler.
5
Attach the chain to the front of the trolley using the master
link.
6
Tighten the chain until the chain sags about 3 inches at the
mid point of the track.
MODEL T
MODEL GT